September 30, 2010

i heart air nailers

When you list your air nailer as one of your BFF's, you know you need to step away from the construction for a little while. I can't help it though, the tool is saving us from the massive arm and hand failure that we would have if every single nail had to be pounded in with a hammer. Not to mention keeping our siding looking a whole lot better. Could you imagine if Captain misses a lot (me) tried to hand hammer all the nails? There would be holes all over the damn garage.


At the start of this project I repeatedly professed my love for the air framing nailer. And I still love it. A whole lot, especially since Pete was able to fix it right back to working after its unfortunate *poooffff* incident. Well now our siding air nailer is getting the same love from me.

This is the one we've purchased. I know that buying an expensive tool for single one-off jobs isn't really in the cards for everyone. And that renting might be a better option for your own needs based on a wide variety of reasons. I just know that for us, and based on the projects that we currently have on our plate, renting a tool like this every time we needed one would be a colossal waste of money. It is much more cost efficient to buy the tool and have it available to us when we need it.

Pete takes really good care of his tools, so this one time investment should last us a long time and can hopefully be put to good use for many people. You never know who will need our help putting up siding! Or if we decided to re-side the entire house ( very likely).

Anyone else out there with power tool bffs also? Or is it just me?

September 29, 2010

To life

Normally I try to keep this blog pretty single focused about house related topics. But sometimes things come in your life that you feel the need to share because they are so significant that you are really forever changed as a person. These last few weeks have been that time, and things have been quite rough around our house lately.


At the beginning of September Pete's Grandpop went into the hospital and when he left nine days later it was with a very serious cancer diagnosis. With knowing the delicate nature of his heath, the family rallied around him trying to make his last days as pleasant and full of love as possible. In a matter of a week Grandpop declined to the point where Pete and I knew it was time to say good bye.


The funeral was yesterday and was a beautiful tribute to the full life of a great man.


September 23, 2010

Tootles Tv

Every fall Pete and I debate the same thing: Should we or should we not cancel the cable down at the beach condo?

For a few years we fell pretty solidly into the Should Not column because of a multitude of reasons. Usually it was because we didn't remember to call until a few months had passed and by that time the disconnect and reconnect fees were going to eat up a lot of our potentials saving. Secondly, we do try to spend time down there in the winter and having tv to watch while you do work around the condo or veg out is really nice. In fact it was lovely to have last winter when we re-did the bathroom. In the past the cable company offered special winter rates that allowed us to get our normal package for a lot cheaper. Which when added with the fees, made it not that bad money wise to just keep the cable.

Last year the cable company dropped a month of the winter rates and then restructered the channels that you got for the low price. Suddenly we were paying a decent amount of money per month for every home shopping channel, one highly political news channel and the local sports station. Nothing else. When we called, the company claimed that in order to get our old channels back we'd have to upgrade our off season package.

Pshaw.

For the rental season we provided a complete (yet basic) cable package and wireless internet. Pretty much the day after our last renters packed up we were at the cable company handing them their box back saying "No more please". We asked about keeping the internet, which would allow us to stream tv and movies, but was told it was going to be $65 a month for that alone. Ha!

Bye internet and tv at the beach house.
Hello $800 a year savings.

September 22, 2010

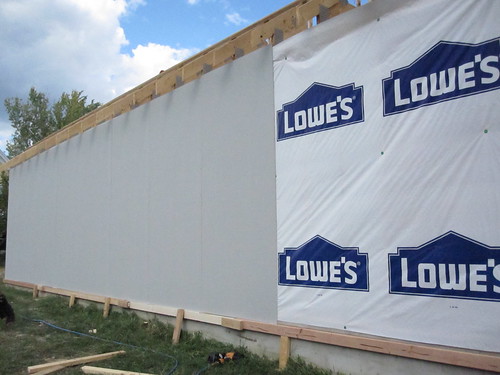
Back wall siding up!


Closing off all the walls one by one...It is strange to not be able to see through the walls and into the backyard anymore! So funny how fast you get used to half done construction.

Since we knew what to expect from having already doing the long wall, there weren't many surprises during putting up the siding on the back wall. Only two small obstacles presented themselves during this wall.

The first was that the back wall of the garage is higher off the ground than the side wall due to the grade of the yard. That meant lifting the heavy panels even higher trying to get them on the support ledge. Thank you Aleeve for calming my screaming back.

The other issue we had to work through was cutting and extending the house wrap higher than the long side. Since the paneling will extend up the back of the garage we needed to make sure all the wood was covered by the house wrap with at least six inch of seams overlapping. Pete had a spare little roll of house wrap hanging out in the other garage that worked perfectly since we didn't feel like cutting up the big mondo roll.


Ta-da!


* Its funny, but I think with this wall up I've discovered a new favorite spot in the yard- right behind the garage! This spot is where we eat lunch while on the job and we chill out in the shade during water breaks. Oh, that pile of rubble next to the tree is left over from our concrete crew earlier in the summer when they tore up the old slab. We saved a decent amount of money if we cleaned up the site ourselves, instead of having the work crew doing it.


September 20, 2010

Our Out Building Money Pit


Not long ago Pete presented me with a little yellow sticky note in the car when he picked me up from work ( we commute together). On it was the total we've spent on the garage so far.


I gagged a bit.


When you're building something big (like a garage) you know it is going to cost money (ok, a lot of money). We had no delusions that this was going to be a cheap project. The wallet was going to have to be opened, even with all the DIY jobs that we were planning on. Mentally preping yourself to spend thousands of dollars only helps so much though. Actually spending the cash and watching your savings account dwindle down lower and lower can be a harsh reality check.


I likend it to planning our wedding. We knew (thanks to our budget) what it was going to cost us overall. Every day those numbers ran through our head while planning. However when it came time to actually write those checks out as the wedding date drew closer and closer...yowch. And then the reality of the bank account the day after the wedding...


Hopefully when it is all said and done I know we'll love the garage and it will have been a really worthwhile investment in our home. When we sit back during water breaks and just look over the construction zone it is so fun to talk about how we'll use it in the future and what will go where. You have to maintain a positive attitude about a big slow job like this, focusing on the end result. Dwelling on the hard middle part can be a big killjoy.

Even though the sticky note number provided a reality check and a reminder that we need to keep tight reigns on the rest of the budget for this project. It was still nice to see how much we've gotten done for that amount. Maybe its because my best friend Google has provided us with some rough estimates for building a four car garage in NJ and so far we're coming in about 50-80% LOWER than those various quotes. One site even had the range for a four car garage at 108,000. Um. I'd stroke out if we spent that. For real.


I'm not trying to be coy about the price spent, I just don't feel comfortable yet giving out the budget until we have something that really shows off our investment. Eventually when it is all done, I post a budget breakdown.


September 17, 2010

First outer wall up!

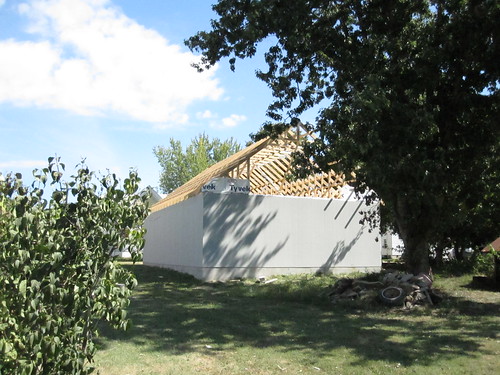
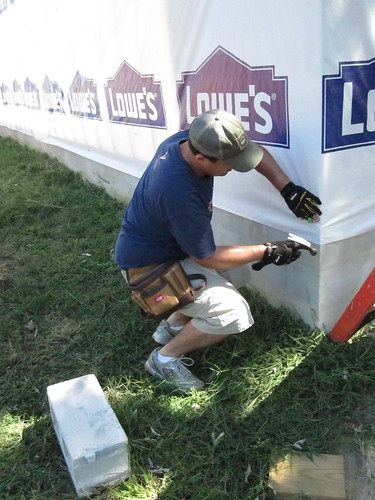
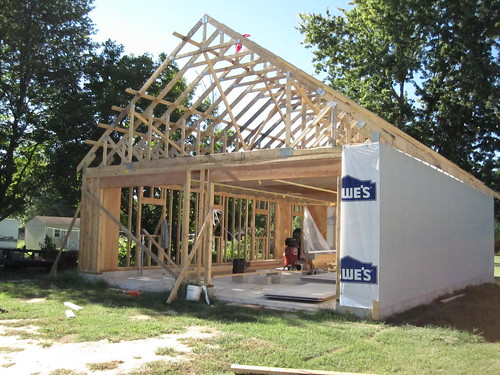
After the garage was mostly framed out, we started on the siding. The first step was to completely wrap the garage with a layer of house wrap. One big mo-fo roll of the house wrap was about $200. You saved $50 if you used the store brand instead of the brand name without a big ol’ logo on the wrap. So we sold out and decided to become corporate whores with the garage wrap ad to save the dollars. You win if you can figure out which big box store we bought the house wrap from, it is very subtle...


Wrapping the whole garage was pretty easy and fun. I unrolled the wrap and pulled it tight while Pete hammered in the nails. You have to pay attention to make sure the wrap stays level and covers all the exposed wood. Other than that, it was nice and easy because while the giant nine foot roll is a little awkward to handle, it isn’t heavy. We wrapped the long western side wall, and tucked the roll back into the garage for the time being. The heavy duty stapler helped get the wrap on the garage nice and tight.


Then, almost excited at the thought putting up our first piece of siding, we grabbed the nine foot section of cement fiber siding and tried to get it up on the wall.


Fail.

There was no way one of us could hold the board in place while the other shot nails in it. The boards are heavy, I’d put them at this-is-really-heavy-and-awkward-to-carry weight range and are extremely hard to handle (impossible) by yourself. We just couldn’t hold the board up flat against the wall and get it secured at the same time.


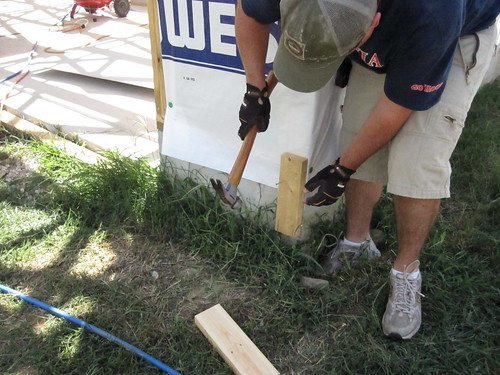
Quickly using those lumps that are three feet above our asses (bonus points if you know the movie ) we turned our plethora of scrap wood into a handy shelf to put the siding on top of. It was a little difficult to level the whole thing and then find a way to secure the shelf because, there was nada to nail it into on the side. The siding needed to cover all the wood which left us with only the cement blocks exposed. As a solution for that We whipped up corner braces and stakes to hammer into the ground for support. About an hour and a half after our original attempt, we try once again to get the siding up.


Success!

The ledge worked fantastically and we were able to get the first panel up and secured with little trouble. That is, if you don’t count the major muscle strain that it took to lift that unwieldy and heavy panel a foot or two into the air. You should see how much Aleve I am taking lately. I had to (temporarily) stop drinking beer because I’m afraid of causing liver damage. Or is that just with Tylenol and I can crack open a cold one after work again?


Second panel did not go up as smoothly as the first. We got the panel up and realize it is crooked. Damn it. Then, I absentmindedly softly kicked it into place- Bad idea! I cracked the bottom and it crumbled off. Whoops. To fix the lopsided bit we grabbed some shims and straightened out the panel using them. Since the west wall of the garage doesn’t have any windows, it is one super long stretch of putting up the full sheets of paneling. This needed to get up not looking like we did it while on a bender.


We worked and worked and worked...

Dealing with some challenges along the way required head scratching until we figured out a solution. Such as one really twisted framing board that fell right where the seam between two panels was supposed to be. A few quick cuts of an extra 2x4 and we had that board sistered right up. There was shimming going on left and right. Sweating, since this was on the sunny side of the building in the afternoon and lots of “I’m gonna drop it!” shouts but after a few hours of super hard work- we had our wall up!


:)

September 15, 2010

Garage Siding Decision

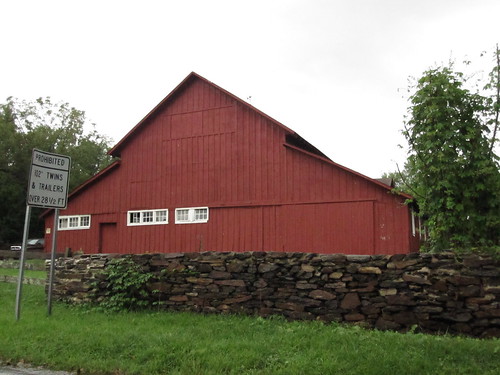
After Pete and I did significant garage and barn stalking about town we decided on a look for the garage. Traditional was going to be the name of the game here for our construction. Board and Batten!

I snapped this inspiration pic while at a stop sign out in PA. For once I was decently speedy with busting out the camera and nabbing a picture in time. Paparazzi I am not.


There was almost no debating different materials for us to use for the siding. We really didn't want vinyl siding thinking that it is much better suited for a different style than we were aiming for. Overall the base price of the vinyl was better than all the options, but we knew that vinyl siding requires plywood or OSB sheathing to be put up underneath. All that wood product, even OSB is about $13 a panel around here, was not going to be budget friendly for us considering the size of our exterior walls.

We'd heard good stuff about fiber cement products and we were pretty much sold on it from the get-go of the project. Doing some more research on the fiber cement products only swayed us right on into the definite column. Fiber cement products, offer some serious protection against rot and bugs, plus has much longer longevity for wear than most anything else. Major bonus and a huge check in the YES column was that fiber cement would not require any wood product sheathing. Saves trees and us money! My fave combo right behind cheese and wine.

Also worth a mention is that I like the pro-environmental aspect for the fiber cement siding, we're always up for doing things environmentally friendly around here. In fact I'm still pushing for geo thermal, solar power or a back yard wind turbine when it comes time to look into electricity or heat/cooling systems. But that is neither here nor there right now.
While fiber cement is certainly not the end all be all green siding primo contender-it is a better earth friendly choice over most traditional home siding options and I think its always worth considering for a new build. Here is a pretty comprehensive guide to the environmental breakdown of fiber cement siding.

Ultimately we decided to not go with Hardie Board, which is the brand name of a fiber cement siding producer. Nothing personal James Hardie, it is just that CertainTeed has the same product you do but for a bit cheaper. We went with the WeatherBoards Cedar No Groove Vertical Pane option. The vertical batten boards will be put on later.


September 14, 2010

garage planning

When we set out to plan this garage we did a couple of planning steps before pulling the trigger on the project.

The first was to pick a size that would suit our needs for now and in the future. Currently we have a two car garage and a healthy sized shed. Both are stuffed full of assorted stuff. We are not minimalists, by any sense of the definition. We also have about a billion and a half cars, plus a riding lawn mower that would all just love proper housing. What can I say? Pete’s a total car guy. Some guys have sports. Mine has engines.

This isn’t a new organization revelation by any means, but we found that for us- we’re able to cut down on the crap by knowing what we have. That means everything should be in one place, so we don’t end up with primer in the attic, basement, shed and that random closet where things just find themselves. In the past when we’ve gone through and really assessed our stock of shctuff we’re pretty much mind blown with how MUCH we have that didn’t get used. One or two or a few times of seeing how much was a wasted purchase or “yes please I will take your handmidown” was enough to get our rears into gear. It had to be a together effort for better organization that we’re always continually working on.

Knowing that we needed a place to store pretty much everything- the cars, the bevy of power tools that Pete treats like children, the construction supplies for all the houses and anything else that might come our way ( children, eventually) - we decided on a four car garage. We knew that would be all we would ever need and then some. Frankly, if we ever max it out then just call “Hoarders” and some therapists because it will be clear we have a big problem.

Second big planning step we took was- How do we want this to look? Since our house is old, and we live in an older town we took a stroll around and stalked out our neighbor’s properties. Besides being slightly creepy as we stood on sidewalks and stared at garages about town, we also noticed a trend. Most of the out building structures were older, quite big and barn like. Since we’re in the middle of a town, I doubt they were full blow farm barns. But smaller stables, livestock pens and carriage houses- definitely. We loved how often they seamlessly went with the main house. Because of that we wanted to build something that looked like it could have always been on the house.

Small side note here, the Wee house is one of the older houses on our current street. I’d place most of our neighbor’s houses at the 50-80 year old mark. Since our house is pushing about 120 years old that means we win! I’ll collect my prize of dealing with termite damage later. In talking to our neighbor he told us about the barn that was originally on his property but has long since been torn down. Pete and I gather that that barn was once ours. This is partially from nothing more than our own need to make up the gaps in history and the fact that it is strange a house of our size and age wouldn’t have a barn. But we think that when our house sold off the land to be divided for the neighborhood- the barn wasn’t on the property anymore.

Once we had the basic design down it came time to plotting out the land for the garage location. Since we have a very narrow but long lot the garage is two cars deep, instead of all across. With that layout it just fits better with the flow of the land. Knowing how we utilize our current yard, we were able to apply those same basic principles of use to the Wee house lawn without living there yet.

Here is the last part of the planning- discussing the budget. We knew this garage wouldn't be cheap, because new construction of this size never is cheap overall. But that we'd defiantly do our hardest to get this built while still being friendly to the bottom line of our total renovation budget. So far we're sticking to the budget like me to that last little bit chocolate cake on a plate.

Then the fun started and we applied for our demolition and construction permits….

September 5, 2010

Dead Something in Basement

Something died in the Wee house basement. I say something because Pete can't even tell what it used to be. No friggen way did I take a peek. The best description he could give me was that "it used to have fur. and is bigger than a mouse" Gag.

The worst part is, it died in the basement drainage hole. Which is full of water. So instead of just being a super nasty dead animal in our basement this has become a liquefied mush of decomposition that is impossible to scoop out and get rid of now. Double Gag.

Basement and first floor of the house stink real bad. Thank goodness we're doing outside jobs only currently. I'm pretty prepared mentally when it comes to finding long dead smallish animal skeletons in the house. We've already come across at least four mouse skeletons and one mummified mouse. But this something is freshly dead, and bigger than a mouse.

Any advice? Should we throw lye down? Bleach? Wait for nature to take its course?

September 3, 2010

Hammer Time! ...'cause the air nailer died

Pete was up on the roof balanced precariously on a 2x4 when our air framing nailer decided to go *POOFFTTT* and die on the job. My best tool friend on the job site was dead! Unfortunately everything we planned to do that day revolved around the framing air nailer. Pete went old school with the hammer and manpower for a few boards, in order to finish what he started but after that he had to switch gears and work something else.


I stayed on the ground, measuring and marking a million boards for our roof purlins. The delay of the air nailer breaking meant I was able to get a lot of them done and stocked up waiting for Pete. Check it out, the garage is really coming along!


Thankfully Pete is super handy and later on in the week (after a few hours of taking the nailer apart, inspecting it very carefully) he was able to find the thingy that seemed to be broken. Some small tweeks were needed and then the air nailer worked again! Phew.

August 30, 2010

Much ado about trusses

Look back over DIY trusses putting up’ing:

- Work with a crew who knows the basics of construction and DIY work. You don’t want to have someone over who has never picked up a hammer before. Enthusiasm -while wonderful is second to skill for this task.


- Be knowledgeable. There were a lot of little things that Pete got done before the trusses went up that I haven’t touched on. Please do not use my thoughts on the garage process as an all encompassing DIY guide to building a garage.


- Realize how dangerous the job can be. When you are alert to the fact you have to be thoughtful and careful the entire time it really helps everyone stay on their toes to keep safety as numero uno.


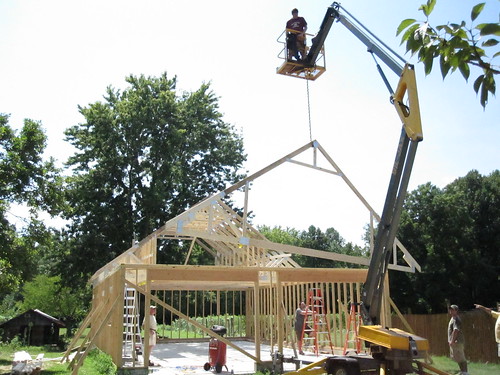
- Have the right equipment! What was done to our garage could have never gotten done without the bucket lift and our firefighter friend manning the controls for it. He was 30 plus feet in the air the entire time and not a peep of complaint. I think maybe we should have gone for a crane though.


After the trusses went up Pete and I talked about the whole day in lengthy detail and what we learned from the job. I told him that I’d be really hesitant to recommend the same route we took to many people who were looking into building a garage. In fact I’m still not convinced that we should have taken the DIY route for this job. It. Was. Hard. This job was one of those times where I’m glad that the final DIY product is good but it was a royal pain to get there.


When you combine everything that is making our garage unique, you get a lot of complications with DIY construction. Th big starting point is the size of 26’ x 40’, which makes it a four car garage (hi, my husband’s name is Pete and he is addicted to cars) instead of the much more regular two car sized garage. The size required almost double the amount of trusses than what would be considered standard. Had it been a normal amount, I think everything would have been able to be wrapped up by 3pm, which was when we were about 2/3rd the way through with the 22 trusses.

Then we have the open room space on the second floor, instead of the space being eaten up by roof supports. While I can’t wait to have all that spare space and think it was a great idea to add for not that much more added money, it also lead to needing a higher roof to create usable headroom space and balance out the first floor car space size. The high pitch also helps to mimic of our house’s roof, trying to tie everything together in some sort of continuity. All together this meant we had bigger and bulkier than normal to handle floor and roof trusses and at almost 200lbs each they just added another layer of difficulty to an already hard job.

Had everything not been New Jersey super sized I think it would have been a bit easier to handle and get done without having a panic attack on my end…

Want to see some more DIY Garage building?
Check out Life Begins at 30's awesome garage! I adore the french door that overlooks their backyard and am a little (lots) jealous at how fast the project seems to be moving along.
The Flipping Couple built a massive space to help house their cars from the frosty Minnesota winter weather.

August 24, 2010

Broken washer update

Remember my washer woes of last week? When the washer at the beach condo up died an untimely death and we were going to be looking at a twelve hundred dollar replacement bill?


Like most of you, repair bills that have commas in them make me shudder.

Immediately I fired up my friend Google and started researching the price of a brand new stackable washer dryer. Since the laundry nook that is the condo is super tiny we can't use a full size normal stack able washer and dryers. Unfortunately it seemed that since the smaller sized stackable appliances are not in high demand they are higher priced than one would think and harder to find in stores ready to buy.

Frustrated I sent off a vent email to a close group of friends.

one of them wrote back " I have a extra one of those stackable sets in my basements. You guys can have it if you think it will work"

Turns out that when my friend bought her house, it came with an almost brand new stacked washer dryer. Then a few years ago she and her husband decide to upgrade to fancy new washer and gas dryer. So the stacked set has sat unused and they've been trying to pawn it off on someone ever since then to get it out of the basement.

We picked up the set on Wednesday of last week and on Friday Pete drove down to the beach condo with his younger sister sitting shot gun as his helper. He had a small four hour window of which to get the old washer and dryer out, the new set upstairs and installed. If everything went well it could work. If the job turned into an epic fail, when then the next renters we had were SOL and without a washer and dryer.

Thankfully everything worked 90% well.

That 10%? The stackable unit is about a half inch too large for the laundry nook so it sticks out past the folding door we had there. Oh well. It works perfectly otherwise and frankly at this point in time was all we needed. Maybe in the off season we'll cut the drywall away behind it to put the door back on.

When this all worked out so well, I felt as if it was all my built up karma points had been cashed in.

Total savings by DIY: $1,150.

August 23, 2010

Rain Delay

The day after the trusses went up dawned grey and misty, and Pete had to head out to work for a morning assignment. By the time Pete returned the mist had turned to steady rain with no sign on the radar of stopping. Undeterred ( or stupid) we geared up to finish a few things on the garage. Having slight hope of catching enough of a clear section of the day in order to get them done.
Silly silly us.
We arrive at the Wee house and it is pouring rain.
See all the piles of wood to the left of the garage sitting on the ground? We moved them "inside" the open garage in hopes of preventing major warping. Once that is done it is still pouring rain. Pete needed to get up to the roof in order to add the purlins, which would be our next step. There is no way it is safe to do that though with all the rain coming down. He was contemplating what to do next when I snapped this pic from under the cover of my pink hard hat.
Here you see me, with my naturally optimistic nature and love of rain keeping a smile on my face. Yeah it was pretty rainy out, but whatever. I try to make the best of every situation.
Half an hour of pushing our giant rented machine around in the sandy mud in order to get it hooked up and I'm twice the drowned rat I was before. The smile is gone, I'm freezing and day dreams of dry shirts are dancing in my head. Behold- the worst picture of myself I've ever put on the internet. The heated seats of our SUV were amazing on the way home.


August 20, 2010

Up go the trusses!


Last Saturday we put up the trusses on the garage...

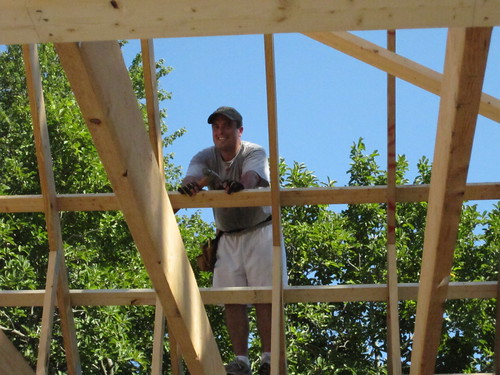
Putting the trusses up was hard all around. It was physically exhausting from lifting, hauling, climbing and running around. Mentally it was tasking because putting up these trusses was a super dangerous job. Weighing in at about 200lbs, 26ft long and about 12ft high for each truss these bad boys were not to be messed with or underestimated. Wrong moves could have spelled disaster for the truss, our framing or worst of all, one of us who were working on the crew. My dad was on a job site once when a roof collapsed and unfortunately there was a fatality because it.


Right before 8 o'clock in the am we roll up to the job site with coffee in hand. During the next hour we go about prepping the site while our recruited helper, my dad plus our friends Eric and Steve, roll in. Then Pete's dad shows up with our rented scissor lift. Which my dad insisted on and we all agreed that it was $350 well friggen spent at the end of the day.


The guys get down to work with hoisting up and placing the first truss. I'm trying to watch to see where a job roll for myself can be created. Unfortunately, this is where it all started to go downhill for me. I can't really explain why, but I was about two steps short of having a complete panic attack by the time the second truss is going up. It must have been that I watching all these guys whom I really care about and love doing such a dangerous job. Whatever it was exactly, I had to stop watching immediately or I knew I was going to loose it.


Since there was really no job for me to be doing on the trusses I went inside the house and decided to do some organizing of supplies and demolition. Getting away from watching the work outside helped immensely and I was able to focus my energy onto something else besides worrying.
Once I calmed down and after my run to Wawa for lunch for everyone, I was able to snap a few pictures of the work happening. Then I ran back inside and did more work there until late afternoon. Some might say I punking out on putting up the trusses and I get that maybe I was a little bit. But the reality really was that there was not anything I could do to help until a certain point.

That certain point came mid-afternoon when about 2/3 of the trusses were up. After a grueling day of hard work (that we seriously appreciated) two of our crew had to leave. Which is when I jumped in to help finish up. There was an established rhythm going on at that point so I was able to find an area of the job that I could do. Soon enough I fit right in and was working along with everyone like part of a well oiled machine.


The sun was going down as the last truss went up 10 hours after placing the first one. At that point I can hardly explain to you readers the sense of relief that I felt. Everything was up and there were no major accidents that occurred. I hugged our friend as he went to go home for the night, thanking him profusely for all the hard work that he put forth for our benefit. Sometimes the kindness of your friends and family really touches you and this was one of those times. They must really like us to do all that work.


Even though the sun was gone, the night wasn't over. Trusses are super sensitive when just set up with no braces and the last thing we wanted was a stiff breeze blowing through and knocking all the hard work done. After a quick pizza and blueberry pie break we got right to work on bracing the trusses for the night. Even though we planned on coming back the next day to finish the bracing you just never know about the weather and what it plans to do, so we wanted the peace of mind.

Right around 10pm we rolled outta there for the night.


Long hard day it was indeed.


August 19, 2010

Almost Truss Time!

You've all seen the finished framing that Pete and I did together, now what you don't know is that it took an additional weekend worth of work to get that frame ready for our pre-made floor and roof trusses. However, I fled the work site and left Pete standing there to shoulder all the final details by himself. The call of the beach was just too great and I jumped in my car to meet my sister and family down the shore for the weekend. It was glorious! (To justify my absence I did clean the entire house before leaving...)


Pete finished all the little framing details and mid week met up with my Dad to get the delivery of the trusses. We thought long and hard about getting pre-made trusses or going the DIY route would be better. After getting quotes from various truss companies Pete worked out what the material cost would be to him for DIY. I'll have to get the exact numbers from him, but the cost difference was not so great that it just made sense to save a lot of headaches and time and to go with pre-made. Especially given the GIANT boards that we would have needed to span the width of the garage, I have no idea how we'd get 24ft boards to our house.


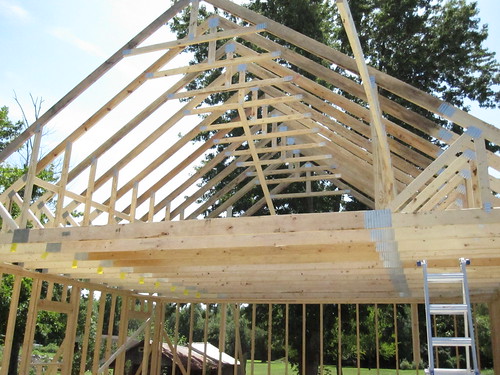
Early Saturday morning we got to the house and these 22 trusses were just waiting to get put up on the garage. These are a little different than standard x trusses because we wanted utilize the second story of the garage as usable space, so all that open space you see between the floor and roof will someday be finished off into a room!

Coming up next: The long Saturday. Putting up the trusses was the hardest house project we've tackled yet.