
All throughout the month of May we had a deadline looming with the approaching Memorial Day holiday. That unofficial kick off of summer meant our beach condo rental season of the beach condo was gearing up to take off. Call me crazy, but I think our renters would be expecting stairs in a two floor condo. Which meant we had to find the time in the jam packed month to rock out the final steps to finishing up the stairs and hallway.
Desperate to not have a repeat of last years ridiculously stressful final project wrap up and pre-season cleaning, we made a realistic time line of what tasks were left. Being honest with ourselves and how much actual work was left made all the difference this year! Instead of stuffing everything into one workfest of a weekend we decided to stretch the time and break our project list into two weekends.
The To-Do list looked something like this:
- Install steps
- Poly and silica coat steps
-Install handrail
- Switch out Microwave cabinet
-Paint "new" media cabinet
- Hang wall art
- Uber deep clean
- Pack up all "our stuff" and put rental items out
- Get burned on beach
In case you don't remember, we decided to make our winter/spring project in the beach condo the staircase and hallway. The staircase was a beat up blue carpeted nightmare topped with a plastic tube as a handrail. Ever since we replaced the hallway/upstairs landing blue carpet with the same laminate wood flooring as downstairs it wasn't a huge project to freshen up the space, but one that was really needed!
Where did I leave off with the stairs...ah yes. I was pissing and moaning about staining the wood steps and how despite my best efforts I couldn't get the stain to absorb evenly. Sigh. Such is a nature of pine and light stains, you can apparently condition the wood all you want but it will still absorb the stain with varying degree. Either that or I just plain suck at one the easiest diy tasks one can do. The great news is that after applying three coats of brush on poly the steps looked 75% than they did when simply stained. Perfectly acceptable for something that is only going to get stepped on IMO.
A big thorn in our sides during this project was wtf to do for the handrail. We checked out every single availible option and debated at length about what to do. Finally, it got down to two weeks left before Memorial day and we needed to pull the trigger on something. As luck would have it, we drive right by the showroom and warehouse of one of the biggest suppliers of sprial staircases in the USA on our way to work. We stopped in on way home and talked to a super nice sales guy about our options. At first he showed us this gorgous custom oak banister that I was drooling over, but it was $900. So I kindly cut the sales chase and said "That's gorgeous, but we're looking for something much more economical and in the DIY range. What do you offer?"
Which is how we ended up with a $300 brushed stainless coil in the back of our car as we pulled away 20 minutes later. It was the cheapest option that looked the best and that we could DIY. A black factory powder coat was availible for an extra $150, which I would have loved to get but could not justify opening the wallet even further for. Even though the railing was way more than we wanted to spend it was justifiable in the fact that we could not find a-n-y-t-h-i-n-g else that work. And rather than continually spend money here and there for experimental items we bit the bullet and bought the item for full blown retail.
Then, by the end of the weekend we had this:

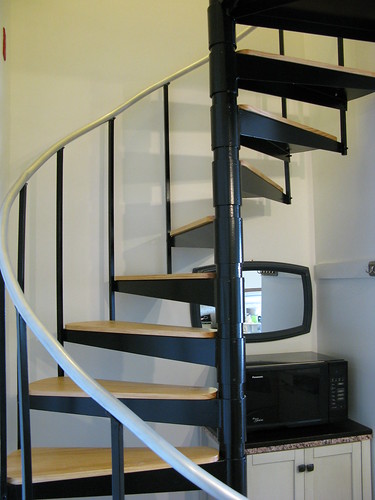
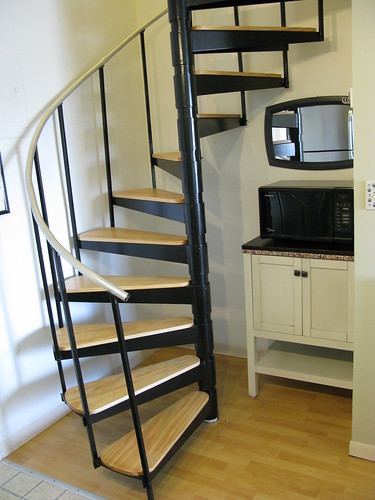
The stairs are complete and I LOVE THEM.
Want to see what we started with? Check out the first post of Opperation Staircase HERE.
They came out so great! I hope the summer renters feel the love.
ReplyDeleteUgh, blogger is being difficult and I'm having trouble leaving comments...
Those look at least one thousand times better than they did when you started. Great job! Inspirational, too, since we've got this on the agenda for sometime in the next, oh, decade or so. Did you glue down the treads or screw them in from underneath?
ReplyDeleteWOW! Those look awesome! Nice job!
ReplyDelete