June 30, 2009

The Real Fourth Door.

I haven't posted much about our newest house... and sometimes pictures speak louder than words. Please feast your eyes upon the before of our actual fourth door (and house that surrounds it).


Why yes, it is another old run-down house in desperate need of love and rehabbing.

I just realized you can't actually see the front door. There really is a door beneath the plastic I'm standing in front of. Swear.

The Dining room awkward middle stage...

Much like people and their awkward adolescence years, most of our rooms had some sort of unfortunate looking middle stage too. We knew that getting rid of the before was a must but all those amazing after ideas were out of budget. Enter the awkward stage for us, where I had never decorated anything bigger than half a dorm room and we had about 5 cents to use for an entire house worth of space that needed fixing.

I hope that we aren't the only people to have ever attempted a room face lift only to reflect back on the work done and say "oh man. this looks horrible. but oh well." If we are indeed the only people who've done the fugly middle improvements then let the following pictures serve as a terrible warning about how things can go so very wrong.


The worst offender is easily the Salmon colored paint. We hated it from the beginning, but there were other more pressing matters for Pete to spend his time and money on. Plus I was uber lazy during this renovation phase with my bedroom painting disaster as a fresh memory, so I certainly wasn't going to be re-painting by myself (oh the horror!).

In conjunction with our best left dead in the 1990's salmon paint there was our dark pine china hutch and dry sink. Bought at a thrift store for cheap we used it as the lacking dining room storage and for displaying my heirloom china. There were grand plans to refinish the dark pine to a much more pleasing color but again, I'm lazy and those plans didn't quite happen.

Now that the years have gone by and I've ramped up my interest and participation with our house I'm certainly better equipped to handle any awkward midvations that will spring up in the future.

My style is (slightly) more clear and I have a much better idea now about how to envision something as a whole of a room within the house. Working within a tight budget will almost always be likely with me, but I've learned how to get what I want out of something cheap instead of just settling for "it will do".

I shudder to look back at how I handled our house during those early years. At the same time that is exactly what this house has been to me most of all, one giant four bedroom learning experience.

June 25, 2009

Where we eat, After

Here is our breakfast nook after we stripped it of all things made in the 60's. After that massive removal the room emerged as a full blown dining room. Not that it matters much because I'm much more a eat anywhere but the table kinda gal.

You'll notice that we extended the same oak hardwoods from the living room into here. I love how it helps to tie the long layout together. The room is so bright, open and sunny! Which is a complete opposite of the before.

Like the lamp? Its the second one we've had because someone ( named me) broke the first version when playing with the dogs one Black Friday morning. I felt so bad that I stayed home while Pete went out shopping with his best friend. Turns out that was the day he bought my engagement ring! So.. I guess its good I broke the light and stayed home :)

There are some hideous in-between pictures that include Salmon colored paint and a dark pine china hut. I have to dig those up for show and tell one day...

Free Paint!

I just got this link from a website that I spend entirely too much time on.
https://www.glidden.com/promotions/free-paint-giveaway.do
Glidden is giving away free Quarts of their paint! Any color you desire in Eggshell finish.

How freaking fun!

I already forgot what color I ordered, but it was pretty pale silver blue. Which is currently my design obsession color of the moment. I've never used Glidden paint before either, so I'm excited to see if I like it. (Yes-it is possible to hate paint)

Dining turned living room after!

Turning the old formal dining room into a living room was a no brainer for us. As was pulling out the old off center fake mantel. Like most rooms in the house we fixed everything up in stages and with a plethora of generous hand me down items.

The old chandelier was taken down and flush mounted low profile light was added. These ceilings are low so anything that dangled down was a poor choice... really really low ceilings. People in the 1850's were short.

Pete ripped off the old paneling from the fireplace one afternoon while I was working. This was a project I just didn't have the vision for at the time and he had to convince me it was a good idea. Of course I now love it! I'm so happy that I was proved wrong and Pete could see how exposing the orginal brick would look good.

There was no awesome old fireplace hiding behind the panaling, just a few plastered up wood burning stove holes. The easiest way to fix that was to get a plug-in fireplace surround. The "flames" are hillarious.

The fastest way to fix gross floors? Carpet. After tearing up all the various layers of flooring we had carpet installed until the time came to figure out better options. For a few years it was the perfect solution. Merry Christmas 2004 to us.

Three years later and the carpet was starting to look a little sad in the main rooms. I guess constant house construction in and out of the front door combined with an old dog makes for hard wear and tear. My adversion to vaccumming was probablly a contributing factor, so out came the living room carpet!

Unfortunately the orginal floors were in no shape for restoring. Shopping around we found a killer deal on 4" hand scraped oak hardwoods. They were clearing out the stock for about $2 sq/ft. Installation was done by Pete and his floor nailer.

See the ferns in the white planters? Yeah, they turned brown and died on me. Somehow I killed them.

June 23, 2009

written from a parking lot during a showing.

Selling your home…

is hard.

We’ve made the decision to sell. Regardless of the happy reasons why we’re selling, its still an emotional process. I didn’t realize how emotionally draining placing that for sale sign in the front yard can be. Now my heart skips a beat every time my husband calls me at work and asks how my day is going, because I always think the next phrase is going to be “I have news that will make today much better” You should see the stupid look that comes across my face every time the realtor calls us. It the perfect mix of hope, excitement and nerves all combined with me holding my breath.

Our house is cleaner than it has ever been before, and we make sure that every time we step out the door that everything is spotless. Not even regular spotless, but the kind where my loveable neat nut of a Mother in Law would approve. Coming from a reformed slob trust me when I say it is so hard (for me) to live in such a clean house, you feel as if nothing can get so much as a smudge. Any projects need to be finished in a short time, less they lead to creating a mess, or the worst offense of potentially creating an overnight mess.

I’ve considered walking around with floor dusters strapped to my feet and a Windex bottle taped to my hand just to maximize all available cleaning time.

We’ve been lucky and there has been a lot of interest in the house already. Showings lead to a false sense of optimism for me. Before them I feel so hopefully that wiping out all the window ledges will lead to an offer and despite our cat digging her claws into my neck as we drive away that everything is worth it. During showings a millions thoughts swarm my head as I wonder what the potential buyers are thinking about our house. Do they like it? Are they hating the living room color as much as me? Did they even show up? Afterwards I feel so dejected when there isn’t an offer sitting on the kitchen table.

After reading this I’m sure all other home sellers are shaking there heads at me. It is just a house. And I’m not the first person in history to put one up for sale. Don’t worry dear readers, soon I’ll stop being optimistic about showings and become jaded and bitter about this whole process.

The new updated kitchen!

This was the kitchen when we moved in... and we lived with it in all its deliciously 60's dated glory for a few years. When there is a roof that you can stick your hand through the houses fug-o kitchen gets bumped down the list on things to do. Despite that the stove was a monster with only one completely working burner and a strong lean to the left.

Eventually the time came to come up with a game plan in the kitchen. We lucked out that the flow and layout were amazingly really workable, so thankfully no plumbing had to be touched or moved! As old as the cabinets were, they were solid wood and in good shape. Not having to demo and replace the cabinets was a huge contributor to keeping the costs down. Pete decided that painting them was the best way to update the look for the cheapest.


Off came all the fronts, hardware and drawers. Everything was carefully numbered so we would know exactly where to put it back. All paint-able surfaces got a good washing to remove any residual ick. Once completely dried we started the painting process. When it comes to painting cabinets time and patience is needed. Between each coat we let the paint cure for a week. Rushing a paint job like this can cause you lots of problems later down the road and we didn't want that. It took a total of almost 4 weeks before we felt ready to place the fronts and drawers back into the kitchen.

New hardware was added, everything is now a great antique-y oil rubbed bronze finish. It fits perfectly in my not bias at all opinion. A normal sized stove was added and the answer to all our domestic problems was installed. Hail to the dishwasher! You have no idea how many spats we had about (not) hand washing the dishes.
A natural stone counter top would look too modern in our house, in our opinion anyway. It was also light years away from the modest budget we were working on. Laminate would have fit the budget, but neither of us found anything we really thought would compliment our house. Large tile was at the top of our options until Pete found the butcher block counter top at Ikea. The butcher block worked with our budget, complimented the house and he was able to DIY for installation.
The back splash was my first experience with tiling and I learned I'm a natural (pats self on back). Tiling speaks to my OCD and anal tendencies that I have when it comes to projects. I like lining the tiles up and making sure every grout line is even. (such a nerd) Pete did all the cuts with the wet saw and I blew through tiling the open walls, together we finished the back splash on one very rainy Saturday.
Finally the kitchen was finished. We ate a meal cooked on a stove with all four burners working and level. The dishes got placed in the dishwasher and all the leftover went inside our non weird name fridge. Live was good.

And, despite my strong Gemini desires to have everything change all the time, I still love the kitchen. Except for a few of the paint choices. But those are really a minor things that don't count.

Showing Feedback...

Makes me want to drink.

One person loves it. Thinks price is great
Other person doesn't like it, thinks price is high.
One person couldn't get in?

I've used the key myself and am thinking of installing a lockbox outside all my houses from now on. Best idea ever avoid a repeat of the Great October Lock Out of 2004.

June 22, 2009

Showing # 8

Another showing this evening.

Here is to hoping they actually show up, unlike yesterdays clients.

Stripe Living Room After

Remember the old stripe on stripe wallpapered living room before? Thankfully that wallpaper peeled off pretty easily (for wallpaper) and we were able to roll up the not quite wall to wall carpet with ease.

Since we like color, and were primarily going to use this room for TV viewing- we decided on a deep, dark movie theater red. Which is a fantastic color for nighttime movie watching, the whole room gets nice and dark with all the focus on the screen in front of you. The room took a coat of tinted primer, which is a must for red paint, and three very heavy handed application of red paint.

All the trim is dark brown, which I've never loved, but I have no inclination repaint all the trim and no idea of what color I'd even use in its place.

The carpet was part of a Christmas present we gave ourselves way back in 2003, and it was (and still is) fantastic to have something clean and new underfoot. I got used to having crunchy carpets at first, so being able to walk around barefoot with no crunch is just wonderful!

June 21, 2009

Showing #7

I'm pretty sure our house got stood up for its showing today.

Frick.

June 20, 2009

Mini Mudroom Improvement

In our mudroom we have a traditional bench and hook shelf set up. Which makes perfect place to stash our keys and drop off any items we're carrying. Not only does having that drop off point so close to the door help keep house clutter down, it also helps me quickly find my keys. If I don't stick my keys on the hook right away I'm sure to loose them and that means frantic moments of tearing the house apart during my search to find them.

The bench was a great Ikea purchase that does double duty because of the storage space inside. Which is where we place the pet food, one quick peak in lets us know if anything is running low before heading out.

It seems that we've placed a few things on the bench that have left their mark(s) on the cushion.
I felt like the stains took away from the clean feeling in the room, and might be distracting to buyers during showings. Also its really just gross to have such a grody stain on your furniture.

Buying a new cushion would be impossible, being as the bench is long since discontinued. I almost purchased a bit of fabric last night to make a cover, but then I remember that I have a few remnants of fabric laying around that would like really nice in the mudroom. They are leftovers from our Ikea curtains in the office.

Up into the attic I went to grab the fabric and my trusty sewing machine!

I put down the cushion in the middle of the fabric and played around with how I wanted wrap it up. I had to make a simple cover, leaving the bottom mostly open because of velcro attachments. Eventually I decided on a very simple folded over design. A little measuring, folding, refolding, pining with the only four pins I could find and then I'm ready to start sewing.
My trusty sewing machine was an awesome birthday present from mom during my teenage years. What teenager wants a sewing machine? Apparently I did! Although my sewing skills have not much improved over the years I'm so happy I have a machine in the house, it has proven itself invaluable over the years.

The whole project took a little less than an hour from start to finish and cost zero dollars and zero cents. Well worth the time and price in my opinion. Everything looks so much cleaner now!

June 19, 2009

The after, downstairs bathroom

Unfortunately there are no before picture to share regarding this bathroom. You'll just have to have faith that it was indeed horrible. I'm doing everyone a great favor by sparing you the visual of all the nastiness that was the before.
The walls are a very pale yellow, which really brightens up such a tight space. Even though the bathroom is small, it's great having another full bath in house! You never know when the upstairs loo will be out of commission like it was during our massive upstairs bathroom remodel. Also very helpful when the two of occupants of the house have to shower/ get ready at the same time.

Our bowl sink was the cheapest one at a big box home improvement store, it cost something around $99 and I thought Pete was insane for spending that much on just a sink at the time. Guess its a good thing that he didn't take me along while shopping for the faucet. I just ( years later) found out how much that thing cost and it took me a while to pick my jaw up off the floor.


The wash stand is actually a microwave cart from Ikea! It was somewhere around the thrifty $30 range and worked perfectly in the tight space with a few modifications! We even bought the matching cabinet and used the top to make a coordinating mirror. The mirror was so simple to make- take off backing, add pre-cut mirror, glue. Done.
See that little metal and white square on the door jamb? Right in the middle of picture, left hand side? That is actually our light switch! It's a touch screen and is almost completely flush with the wall. That where we had to put the light switch if we wanted it inside the room, so using the slim line touch was the solution to the problem. If we had to do a traditional switch, it would have had to be placed outside the actual bathroom. Which would have meant that there would have been many years of hijinks of turning off the lights while someone was on the john :)

This was the first tile floor that Pete ever put down and I think it looks fantastic! We used sage as a good neutral accent for the yellow paint because the standard blah beige just didn't look quite right. When this bathroom got finished it was so wonderful to have a completely clean and renovated place to shower. I then claimed it as "mine" and stuck Pete with the old lilac germ shower upstairs. So generous of me, I know.

Another showing today!

Our realtor called during dinner last night and of course my stupid wide-eye hopeful excited nervous face came over me. That face happens whenever he calls. He just was calling to OK the time for a showing tonight. Which is great, but man I was hoping for an offer.

In my last post I mentioned the nerves that my stomach gets when I know we're having a showing. Something about the feeling being along the lines of tap dancing caterpillars. I meant centipedes, the bugs with lots o' tiny feet, not caterpillars which are bugs that just inch along with no feet. Cause really, how would a caterpillar put on tap shoes when he has no feet?! Lets be somewhat realistic here!

June 18, 2009

2 showings today!

Whenever we have a showing I feel like tiny caterpillars are tap dancing in my stomach all day.

Today we have two showings.

The caterpillars are going crazy.

June 17, 2009

Evolution of the Shed...

Pardon me, I mean Summer House...
When we moved in the shed looked like this, and was completely empty except for piles of old leaves. As the house renovations went on the shed was used to store all sorts of random construction materials. Much easier to store stuff in a building that actually had a roof, unlike like the house for the first summer.

Then in 2008 we came home from a wedding to this lovely sight. A freak March storm tore one of the HUGE limbs off the old Maple tree and landed in right onto the shed and garage. Those two roofs got crushed and littered full of Maple branch shrapnel. Not even the Mustang was spared inside the garage...the poor car caught a couple of new dents from limbs coming through the roof.

Pete replaced the garage roof last summer, it was a few weekends to rip everything off, patch and re-shingle. I can't help much with roofs being that I hyperventilate somewhere around the second rung on the ladder. Once the roof was finished Pete painted the garage to match the house, and it looks awesome now all spiffed up!

However...we did nothing to the summer house shed. In fact the area around the shed got completely overgrown last summer with all sorts of weeds, poison ivy, seedlings and other useless plants.

Looks gross huh? and it was the first thing you saw while pulling in the driveway. Pete and I bickered over fixing it up before putting the property on the market. I was pro fixing, Pete was against. He relented when the Real Estate Agents strongly suggested fixing it before the house got listed. So we took a weekend to replace the roof, clean the underbrush and paint. It was a long, no fun weekend...

Friday- Adult Married Person Date Night at Lowe's! Get all supplies needed for roof.

Saturday- Weed garden. Clean up shingles as Pete tears them off. Start pulling down creeping vines of poison ivy. Go to dump and help throw out all the shingles. Own personal hell at dump. Hot, Dizzy and getting leared at by the drunk guy next to us. Get back home and continue with clearing out overgrowth/poison ivy.

Sunday- Paint crusty old picnic bench red. Looks adorable now. Clear out more underbrush.
Husband finished roof right after the sun sets.

Monday- Realize that I am indeed allergic to poison ivy. Get home from work and break out the paint. Each of us picks a side and goes to work trying to beat the setting sun. Finish painting moments before its too dark to see anymore.

After one weekend of uber hard work from both of us, the shed is done! We're happy, our agents are happy...even the dog is happy!

House for sale...

Last week we accomplished something a long time in the making. Pete and I sat down with our Realtors, talked shop and signed the sale papers. This is the first time we've ever put a property up for sale, so everything is uncharted sellers territory for us.

I can't help but to be stupidly optimistic about selling the house, even in a bad market coupled with a crappy economy. I guess all sellers see the greatness in their own homes, as they are such personal things. I'm attached to this house, far more than the buying who is simply looking at another listing. Everything reminds me of something, from the carpets we bought as our Christmas presents to the tile in the back splash we picked out and put up together. I can see ourselves growing and living in the house over the years, and now I'm opening it up for strangers to see the same things. Or for them to judge me on all the choices we made regarding renovation and decorating.

When we get a showing I always think the same things, will they see the potential? will the railroad turn them off before even stepping in the house? are these our buyers? The hour that we spend away from home is nerve wracking for me.

In one week we've scheduled five showings, with only one cancellation. Even if it takes 90 showings... that is only 18ish weeks if we keep up the current pace! Ha!I'm not so certain I can actually keep the house clean for 18 weeks.

June 16, 2009

Master Bedroom After.

The master bedroom paint was my first experience with picking the wrong paint color from the tiny sample chips. Aiming for a light and soothing sage we ended up with something that was actual a very light, very bright Miami beach mint. This mistake taught us to always go a shade or two darker than the chip we liked. I find that paint usually ends up look lighter once its all over the wall.

Painting the room was a task I tackled in the summer of 2004. Since I was off for the summer and worked wacky retail hours I figured painting our bedroom would be a good use of my free time. I guess this room was my first official home improvement project on the house! And amazingly I stuck with the house even after ending up on the bed clutching the paint brush crying in the fetal position.

Having spent hours scraping off all the wallpaper I could, it was time to paint. Commence with rolling on the primer. Second layer of primer. First layer of paint. Stop rolling paint to pick off old wallpaper backing that decided to come off the wall. Paint. Stop and pick off layer of primer that has come off. Paint. Continue with the 'paint and pick off' pattern until one wall is finished. That is when I realize that color is not the spa inspired sage we wanted, but a bright Boca beach mint.

Grit teeth and I decide that maybe the color just needs a second coat. A second coat will solve all my color woes! Except the second coat just makes the color worse. The heat of a non AC room is combining with three layers of paint fumes. My thighs are sweating so much that I can't even crouch down to paint the trim without slipping and falling over.

The whole room is now the wrong color. My first attempt at picking something out for our house and it is horribly wrong. and its hot. I climbed into bed and just started to cry. An entire day spent working was wasted along my first chance to prove I was going to be a good designer for our home and it was all an epic fail.

Eventually Pete came home and laughed over the horrible paint color with me. We went off to the store and picked out a new, much darker, color. We still didn't get it quite right on the second go-round, but it was much better and I didn't feel like re-painting again.

The final after, like all our rooms the Master went through a few different stages before reaching this point. Those stages included carpeting, a built in for the tv, curtains for closet doors and bamboo blinds that did nothing to block the light. Slowly we ripped out the carpet, put down hardwoods, tore out the built in unit and reattached the closet doors with nicer hardware.

i love my shower.

In our old and lovely Lilac bathroom I would clean by pouring bleach on the floor. Watching the bleach work its way down my tilted bathroom floor and pool into the corner was the only way I felt like the germs lurking under the peeling vinyl tiles would die. After my massive bleach pour I'd have to go lie down from the fumes and that would cut my bathroom cleaning time short. There is always an excuse when it comes to cleaning for me.


Here is the result from when we tried to fix the room up a bit... That meant replacing the toilet and sink with ones that looked like they were manufactured this century. Also I may have gotten over zealous again and peeled off all the wallpaper (shelf paper) in a fit of disgust for it.

Clearly the whole thing would have to get demo'd. There was no fixing this hot mess with paint alone. We got to work gutting everything, but leaving the original foot print of the bathroom in tact. Dealing with permits and moving plumbing are not my idea of fun and would have slowed the process down a ton.

I helped my husband hang drywall and it almost killed me. I held the entire ceiling sheet over my head as he screwed it in and my lungs threatened to blow up while inside my chest. My upper body was sore for days afterwards... I'm a complainer by nature though...so maybe it was more like minutes or hours.

Choosing the bathroom colors/tiles was pretty easy. The room is small and needed to look airy so a light color was in order, but we wanted something that looked like it could have been part of the house originally... or original to when indoor plumbing was invented. I love the subway tiles that are on the wall and shower more than a person should really love tiles.


The upper walls are leftover bead board, painted a cool grey because bright white walls would have looked too stark. The sink console was the best non sale buy we've ever gotten from Lowe's, it included everything! Even the mirror. I'm seriously in love with it and haven't seen it since we bought it. I guess they realized it was a good buy and discontinued it?

However the best thing about the room is something you can't see. We put in heated floors! and they are amazing in the winter. Everyone doing a bathroom renovation better put that on the top of the must do list. I can not stress enough how it makes getting out of your warm and cozy bed on a cold winter morning just a little less jarring.

June 15, 2009

The Deck

Welcome to the back door area! There are no before pictures of this space, but you can rest assured that it wasn't very pretty. At all.


A blah and rather useless side yard got turned into something so welcoming and relaxing pretty easily. We just added some hanging plants, a little side garden, grill and a seating area. Most nice summer evening we'll bring dinner/wine/beer out here and relax while dining al fresco. Since its just the two of us and we never ever host people, a tiny cafe table fit the bill perfectly. The metal table was an under $30 purchase from Home Goods, which is where we also snagged the rustic look wood folding chairs.

Planters full of flowers add cheer to the area. That is when I'm not busy killing all my potted plants with my black, oddly misshaped thumb. There is a little herb garden off the front of the deck and a butterfly bush. So far the garden has held Rosemary (Died), Lavender (transplanted), Oregano (Died), Basil (ate by Rabbits), Mint and Thyme. The mint is growing like ganbusters which pleases me greatly because I love Mojito's.

Bedroom #2, After

No matter how much time passes I can still remember how hard bedroom #2 was to renovate. There are not paint fumes in the world strong enough to erase those memories. By far it was one of the more labor intensive and ball busting rooms of the house, especially considering it was just a bedroom...


May 2003-Move in, and love the large open Secret room that is hiding behind the hobbit doorway. Hate the dingy dankness that overpowers the room with its stale smell and crunchy carpet that held years worth of other people's ick. Since the roof was leaking at a considerable rate and was first on the list for repair, we stored all attic type items in this room.

Years go by and our packrat tendencies start to become apparent. The bedroom has turned into a jumble of useless stuff with no semblance of organization. Whenever we needed to store something, it just got tossed into the ever growing pile in the room.

Spring 2007- Armed with a mass of plastic bins and trash bags we tackled the room. Painstakingly weed through years of free donations and crap, making sure everything went its correct place, which might have been out to the trash pile or curb with a Free sign attached. The room slowly began to clear out.

Summer 2007- Loaded down with buckets of warm vinegar water and scraping tools my sisters in laws and I attacked the peeling wallpaper and dis-gus-ting soot (yes, soot! why? how? I have no answers) It took days of backbreaking labor to get the walls as smooth as possible, all while working during July in an upstairs room that had one window and NO AC! The only reason I survived without scraping my eyeballs out was thanks to massive amounts of iced coffee.
Thank you McDonald's, you have no idea how your x-large black iced coffee kept me calm, cool and happy enough to carry on.

After the scraping and washing came painting the room in the dead heat of a New Jersey July. We made the decision to spare ourselves that task and paid my sister in laws to do during the work week. Both girls (twins) were about to be college freshman, so they needed all the extra odd job income as possible. Paying them worked out for everyone involved.

Next came pulling up the floor coverings and we had not a clue at what could be hiding underneath the FIVE LAYERS of flooring that was down.
  1. First layer was easy enough, it just was a smaller carpet remnant designed act as an accent rug.

  2. Next was an almost wall to wall (but not quite!) gross scratchy flimsy type of carpet. Blech, the carpet backing had hardened and left us covered with its plastic 60's carpet dust.

  3. Wood plank look laminate. Except the laminate was cut and laid down so that only a few feet protruded from the wall. Leaving a giant square in the middle not covered by the wood look... (look closely at the before picture up top, you'll see the this layer under the carpet)

  4. ...Because they put a carpet print laminate underneath. To give the illusion of a large area rug surrounded by wood. Except that the rug and wood were both made of plastic. and looked like crap.
  5. The very bottom layer of flooring was another rug look laminate. Surprisingly it looked the nicest out of all the previous layers we just pulled up.
New carpet was properly laid down and we shoved our old queen bed through the door with seriously not one spare millimeter to spare. There were some serious doubts about getting any size mattress through this tiny hobbit door, so we were pleasantly surprised when normal furniture fit through with no problem!

Close up of our new Anthropologie door knob. Since the door came with no knob we went on a mission to find a solution. Unfortunately reclaimed knobs didn't work since they were missing an important part. Regular big box store knobs weren't cutting it in the design department either. We got lucky and scored this knob for 50% off in the Anthropologie sale section!

Finally, after all that hard work we have a very cheerful guest room. Now I just need to convince someone to drive down here and spend the night.

June 14, 2009

Bedroom #3- After


Bedroom #3... Amazing what a clean coat of paint and new carpet can do! I love how the gray looks against the crisp white trim. This color is a new favorite of mine, it is a great warm gray and I have plans to use it in the new house.

This room was among the least labor intensive for us. Nothing had to be demo'ed or remodeled. A few hours of pulling up all the old flooring and painting, coupled with a deep intense cleaning was the extent of our efforts to transform the room.

June 11, 2009

After- Bedroom #1 turned Office

Four bedrooms for two people who never have house guests is a little excessive. So we turned bedroom #1, which was the smallest and had the enclave for the walk up attic landing, into an office. We took off the door which really helped the upstairs hallway seem brighter and more open.

Not featured is the molding and new light fixture but there are no more bare bulbs in this room! This was one of the first colors we picked out while painting the interior colors years ago and it is currently one of the only ones that I still like. Sometimes going for a darker color or non neutral in a small space is risky but we wanted some color and personality in the room. I think the light floors, trim and ceiling help to keep everything from feeling like its closing in on you.

My husband made me the bookshelf and I love it! Its perfect for all our bookshelf needs (of which I have many) and is nice solid wood, quality piece of furniture. I can definitely see me moving that bookshelf to a ton of different locations all around the house over the years.

The old oak chair was picked up at a antique store for about $20 and I now think we overpaid. Especially considering that it has a huge crack in the back, needs to be recovered and the wood "carvings" in front pieces are not carved but glued on. Ce la vie. I want to paint the chair, and hopefully can convince Pete that I should make painting it a project soon.

The trunk is steamer trunk from around the 1900's and it hides all our random computer equipment, you know the stuff your never sure if you need to throw away or not. It has a flat top, so I plan on repurposing it as a coffee or side table in the future.

After...The house

Now that everyone has seen the before I figure its time for the after pictures. This is what six long years of work, blood, sweat and tears on a tight budget looks like.


Quite a difference! At least I think so.

Sure there are a million things we would change or have done differently now. But we did what we thought was right or fit out tastes and budget at the time. The learning curve was so steep on this house.

For instance, we didn't pick the current paint color. It was quite a shock when we got home and saw this green brown instead of the light sage we thought the paint really was. Picking out the paint color meant an hour on a model home street in Maryland where we climbed over fences to hold up paint chips to actual homes comparing and debating all the different colors. Finally we left with what we thought was the perfect pale green shade.

Somehow paint chips must have gotten mixed up, or too much time passed and we forgot what color was right. After getting a huge drum of custom mixed Ralph Lauren Khaki and handing it over to the contractor, we came home to a house of a completely different color. But it ended up working out just fine and I think fits the historic feel of the house more than the original color we wanted.

We know now that you should get tester cans of all exterior colors first and apply them in two foot sections. That way you can see the color on your house in all different lighting conditions. Not just peeking into a giant drum of paint and saying "huh... I'm sure it will dry lighter"

Garage Before and After!

While house hunting we had a very short list of must haves. Simple things such as walls and a roof. While our house came close to not having a roof, I guess you can call five layers of rotting shingles a roof...

The number one must have was a driveway, so you can imagine how very thrilled my boyfriend was when the Wtown house had a two car cinder block detached garage. I'm pretty sure it was the garage that sold him the house. After 8 long years of sitting out in the weather my boyfriends 1967 Mustang was going to have a proper parking area. I think the car said thank you when it got backed into the garage for the first time.


Here is what the garage looked like before. The green and white house theme spread to the garage as well. No building escaped the green shingles, but thankfully it was awning free. I've circled (in pink) the exposed live wire that used to run right out from the house to the garage. All the insulation dry rotted off the wire. Super safe.

And After! This is the final after...


Yes, I have a weed filled driveway. I salted it recently and am waiting for all the plants to die before pulling them up. Weeding your driveway is a giant PIA.

June 10, 2009

Bedrooms 1-2-3. Before

For the remaining three bedrooms I'm wrapping them up in one single post.

Welcome to bedroom #1 and my favorite parts of the before pictures.

  • Old crusty carpet that is yet again plopped down in a size that is roughly big enough, but still falls oh so very short of complete floor coverage.
  • The stenciling.
  • Fancy $1.00 roll up blind.
  • Did non of the rooms have light covers?

Bedroom #2, or the secret room. The door for this room was clearly built for a hobbit and being so small one would expect a room about the size of a closet behind it. Except its actually the second biggest bedroom in the house! Dingy, dirty and has the dubious distinction of having the most layers of flooring of all the rooms. (5)
And finally we have Bedroom #3.


Just the usual in here, ugly outdated flooring that doesn't fit. Horrible wallpaper border and a two tone wall where they clearly didn't feel like moving something to paint behind it.
The afters are coming soon! I promise!

Before- I Showered in that?!

Welcome to the bathroom, where the color Lilac came to die.


Everything in the bathroom was purple. From the purple veined tiles down to the lilac flecks in the linoleum floor. Where does one find a purple toilet you ask? I have no idea. Because even in a huge warehouse full of old toilets ( Second Chance Warehouses in Baltimore, Awesome for salvage stuff) I did not even see one lovely lilac commode. Take notice of the soap holder in the shower, it fell off on our friends foot one day not long after the picture was taken.


You like the wallpaper? It was actually shelf paper. Which is very thin, sorta see through and was tough as nails to peel off. Ironic, but the shelf paper/ wallpaper was NOT used to line the shelves of the bathroom's linen closet.

The Master Bedroom, before

Words might fail me here when I try to explain the master bedroom and the condition it was in when we moved in. Another room where the flooring was haphazardly throw down, you can see where it falls short or shifted in the corner by the closet. The closet was painted purple and smelled like death inside. The wallpaper was old and peeling off in random places. You don't have to look that closely to see a huge chunk missing under the window. I may have gotten overzealous and peeled a ton more off that night, and we didn't have a trash bag handy which maybe caused me to leave the wallpaper bits on the floor.

See the pillow on the floor? That's where we slept the first night after closing. I created a make shift bed out of every blanket we owned and the next morning woke up staring at all the peeling wallpaper and dirty carpet goodness. ( That morning was also my birthday)

What a couple of excited kids we must have been to camp out on that floor...


June 9, 2009

Living Room- Before

If you don't like dirty rooms, I suggest looking away now. We're getting out of the nicer fugly rooms and headed into the-omg-people-lived-like-this fugly rooms.

Enter our living room while I highlight one of my favorite before features. Please gander at the striped wallpaper. Notice how the subtle yellows, greens and browns play off one another in a deliciously 70's pattern.


Now check out the border. Why that looks like it matches the wallpaper! It does match, because it is the same wallpaper. Simply cut wallpaper into strips and hang on the horizontal! Wah-lah. Instant matching border. Bonus points if you get the stripes to match up. No worries if they don't or if you didn't cut in a straight line.


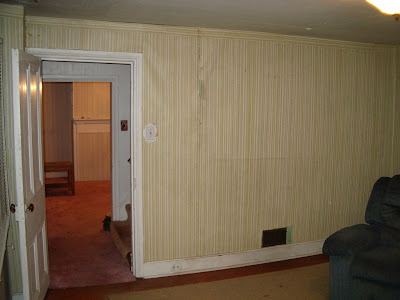
Here is also where you start seeing the running trend of not putting down wall to wall carpet and simply plopping a floor covering that is roughly big enough down. We got lucky in this room though, it only had two layers for pulling up.