March 29, 2011

Crank Pot is Me

New Jersey missed the memo that it is currently spring. We're dealing with January temperatures here where the mercury dips down into the freezing zone at night and barely gets enough sunshine out during the day to do a damn warmth wise. It is so cold for March that we had to turn out heater back on, after we though we shut it down for the season two weeks ago.

In this weather it tends to be the wind that does you in comfort wise. Turning an otherwise enjoyable sunny cold weather day, into some sort of horrible blustery experience where you curse the sky for taunting you with cold sunshine and whatever the reason is that makes you be outside. It's been in that cold sunshine where we've been spending some quality weekend time at the garage lately.

However, once there I've been maxing out after two hours of work because the weather and house situation makes me incredibly grumpy. Pete witnesses his normally way perky wife morph into some sort of snappy bitch from hell in about 90 minutes. The last half hour has got to be torture for him as I stomp around the place ready to snap necks, complete with eye rolling and glares. Until I finally give up work in a fit and go to the warmest place in the house to stew in silence alone. Sitting on the plastic wrapped screen porch on top of an empty dresser. Staring at the rusty screens and astro turfed cement, wondering what the hell I was thinking with this house, with all our houses, until it is time to leave.

The worst part about my fits is that I can't stop it from happening and nothing short of leaving the work site gets me back to normal. My natural disposition is to be an optimist that has a perma smile plastered on my face. That crummy attitude isn't who I am at all. But the houses are just draining me right now. I feel like they're four giant leeches that I can't shake off even though I so desperately want to be rid of them and move on with my life.

Anyone whose ever done any home renovations who didn't tell you that they hit low points along the journey is full of lies. Lying to safe face about their decision. Lying to themselves. Or so pumped full of something that makes all work blend into a happy fuzzy haze.

Overall, I'm frustrated at our shitty homes and a little burnt out. Those feelings are just my reality right now. Will I turn around again? Yes. I know I will. Being cyclical with my emotions is a standard MO for me. Sometime along the line I'll get my optimism back, my drive and the ability to pound out 12 hour shifts of hard work for our future on our craptastic houses. But currently, I want to stew in the cold non-spring weather being a miserable bitch about everything house related.

There you go.

True confessionals of a DIY'er.

March 23, 2011

Pretty new air nail gun!


Our air nailer is dead.

Died. Gone. Bought the farm. Bit the spoon. Finished.
You might remember this is the same air nailer that pooped out some time back in September. When it up and left Pete up on the roof high and dr, where he had to start swinging a hammer in order to finish the purlins. At that time we debated buying a new nailer, but being in the midst of shelling out big bucks for the garage construction we really didn't want to part with the $200 it would cost for a spanky new air nailer. Thankfully Pete was able to apply his ridiculously mechanical brain towards the nailer, opened it up and spiffed it back up to life.


And then a few months later, Pete fell from the second story of the garage. During that fall, he dropped the air nailer onto the cement floor and then landed a sheet of plywood combined with his entire body weight on top of the nailer. Apparently all those things are a deadly combo for an already on the brink nailer, because shortly after all that happened, the nailer ceased to work indefinitely.

In case it is not abundantly clear from my posts- WE NEED A FRAMING AIR NAILER.

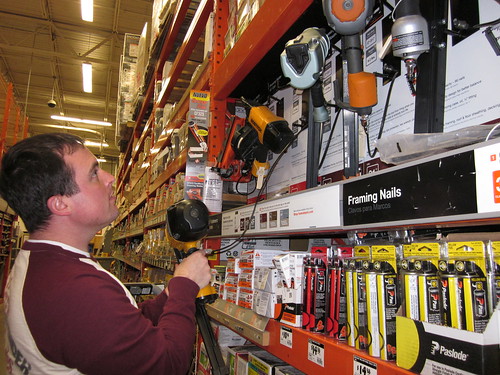
Since we try not to look at dropping two Benjamin's lightly, a ton of research went into finding a new nailer. Almost immediately we discounted getting the same air nailer, a Porter Cable, again. Overall we weren't thrilled with the longevity performance. It wasn't that old, only about 6 years, and did break once before dropping it onto cement. We don't count the falling incident against the performance, since it was human error. Frankly I would expect something to last longer given the amount of use the nailer got combined with how well we (mostly) treat our tools.


Shopping for a new nailer at ye' olde orange warehouse store.

There was much debate about using clipped head vs. round heads, as well as which brand we should go for between Bostitch, Dewalt and Hitachi. Why those brands? Bostitch is the brand of our siding nailer and we've been pleased with that so far. Dewalt because I'm a total whore for their brands and believe they make a quality product. Hitachi is another brand we've heard good things about and is aimed at Pros, so we thought it could handle the amount of work that we'll be throwing toward it during this renovation.
Ultimately, it was the clipped head Hitachi that won out.

Which I find, strangely enough, really pretty. That just excites the girly girl inside of me to use it more!

March 17, 2011

Happy St.Pat's!

For our first anniversary back in 2009 Pete and I took a trip to Emerald Isle...


He got food poisoning and I drank my weight in Guinness and Bulmers.


Once Pete was on the mend, we spent a lovely morning learning about our favorite beer


and I finally got to see a real castle!

although I never did pretend I was a princess when I was little. Usually my imagination had me as the stable hand or had some equally not glamorous position within the castle walls.


This uber lame and extremely last minute photo essay (which is composed of snatched pictures from facebook) covers about 1/10th of our Ireland trip and is my way of wishing everyone a Happy St. Patrick's Day!!

March 15, 2011

Stain boo-boo

This weekend marked my first ever solo staining project...the stair treads for our spiral staircase.

Let's just say, my staining for this project wouldn't be categorized as winning.

The truth is the physical process of staining the wood was incredibly easy. Brush on, count to ten, wipe off and then let dry. The frustrating and non-winning part came when I tried to get a uniform stain on the wood. Despite using a wood condition prior to the stain, my warm honey colored stain came out looking like I dropped melted red crayons onto the stairs and then chiseled the wax off with a putty knife. Random spots drank up a lot of the red and parts of the stairs ended up looking uber splotchy. Overall the stairs look great and I'm really happy with the actual color of the stain, just sad that it looks so blotchy.

I'm not sure if I need more practice, another type of wood or a different color stain all together I've heard that darker color stain is easier to work with because it just cover so much and makes the imperfections a lot harder to notice.

Sigh.

Since these imperfections are noticable (especially to me) I'm not sure about the next steps I should take to fix/hide them. The option is out there to sand down and re-stain every stair but I'm afraid that would just leave me in the same predicament and would eat up a lot of time. Currently my favorite option is to remind myself that the stairs are going to be set in a darker corner of the condo, away from direct sunlight and are going to get stepped on by a whole host of not-so-gentle feet over the years. When I tell myself that, 'perfection and show quality' isn't what is what is exactly needed there. Also, I may have deluded myself into thinking that a coat of poly will help. Don't ask me how or why, I just hold on to the thought that poly will make it all better.

Hopefully I just needed to step away from the project and revist it with fresh eyes that aren't so critical. Maybe the blotches will have magically fixed themselves yesterday?!

Am I the only one out there that has failed on staining pine with a light color? Wait. Don't answer. I don't think I can handle the truth of knowing that I fubar'ed something that is so basic in the DIY world...

March 7, 2011

Opperation Staircase... p3.

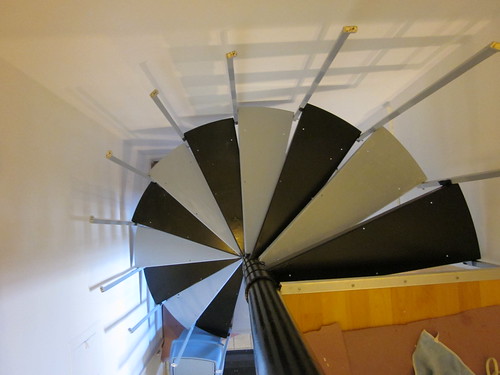
A weekend or two later, Pete and I returned to beach condo ready to finish painting the stairs. As much as the two toned look works for some people, we wanted the whole staircase to be a pretty glossy black. In the interest of being able to still use the stairs- you know, to access the only bathroom and bedroom in the joint- we had to work using the paint every other stair method.
Which how we ended up with this spunky black and gray painted staircase after the second go-round with primer was applied. The black stairs were dry and we were able to walk upstairs very carefully while waiting for the gray primer to dry.
The poor dog was so confused about why she couldn't follow us up the stairs anymore! We had to carry her up and down the stairs to make sure she didn't end up a mess of white puppy streaked with paint.

Left of the project To-Do's:

Reveal pretty all-black stairs! (They look awesome. so awesome that I forgot to snap a pic.)

Find flexible stair rail. Any suggestions? We threw out the hideous plastic tube that used to be on there. It was really bad looking and we didn't want to be tempted to put it back on there out of laziness/desperation

Router the wooden steps out. It took multiple attempts (last count was 4 tries) but we finally got all the wood we needed for the project.

Stain steps.

Attach steps to stairs.

Show off the new door that Pete built for our heater closet.

Find/make wall art for stairway walls.

Find a free weekend to take the trip down to the condo to put it all together. This alone is going to be tricky for us, suddenly we're on the verge of spring around here and I'm finding our calendars are threatening us having no available weekend free time.

March 2, 2011

Priming and Painting the Stairs...

Moving back to our current spiral staircase renovation:


We left off with the stairs ready for an application of our heavy duty primer, Shelac Based Zinsser primer tinted a lovely shade of gray. The tint helps to provide a perfect base to our glossy black paint, or any darker paint.

Why Shellac? Mainly because it is uber durable and offers a great surface for the actual paint to grab onto. We really don't want to ever have to repaint the stairs again during our tenure of ownership at the condo, and they get a lot of high traffic abuse during the summer months. You can see in the pictures that a lot of the stairs had some rust stain issues, and even though we were using black paint, we didn't want anything to leak through the final coat. Also, it's made from beetles, like crawly little bugs, I find that pretty interesting...


When it came time for painting, we did the every other stair method for coverage,that way the we could still utilize the stairs, since the only bathroom in the place is on the second floor. Hoofing it up the stairs every other one with no railing is murder on your knees and for people with balance issues (me.).


A few hours later, after the primer was extra dry... we cracked open the black paint and started rolling away. That night we were under an extreme time crunch, so the black paint had to get down and then we needed to get outta there asap. Which worked out because the fumes from the paint and primer were almost overwhelming us. The night ended with us getting outta there without being able to take a moment to step back and check out the transformation taking place.

March 1, 2011

Look for Less: Couch Edition

I haven't noticed the Oasis at C&B until recently, when it caught my eye in the catalog spread. Very casual in comfy chic kinda way. Something I'd want to put in a sun room or in a shore house. Not that long ago, I got a chance to plop down on the Oasis in the store.

( It was awesome. I love couches that aren't mine)


Then I noticed the Landon sofa at Macy's:
The price comes in at $1,099, which is about 1k off the full retail price of the Oasis.


There are some differences I can spot right off the bat in the picture but you do have to go photo hunting for most of them...The one thing I'd want to make sure of is that the bottom cushions are as cushy and wonderful as the C&B version. They don't look as full in the photos, but photos can be a little deceiving.