
When you start demo'ing a room it helps to have a plan of attack. Even if the eventual goal is to have that entire room torn down to the studs, you still have to have the steps planned from A to end point Z. It seems almost ironic to you need to plan out the mass chaos that you are about to impart upon the room. But taking a few minutes to mentally plot out your crowbar attack saves such frustration and effort that plotting the destruction is so worth it!
Here is how I started with our upstairs bedroom. I knew that paneling would be the big thing that had to go and that was my main objective item to get out of there.
First up was to tear out the makeshift closet up on the back wall. After that 'closet' came down I looked up, which is when I realized that the ceiling tiles should/had to come down before the wall panels did. I had to take the ceiling down first for this room, but it is also usually best to work from the top down when demo'ing a room.
First up was to tear out the makeshift closet up on the back wall. After that 'closet' came down I looked up, which is when I realized that the ceiling tiles should/had to come down before the wall panels did. I had to take the ceiling down first for this room, but it is also usually best to work from the top down when demo'ing a room.
Closet bar and shelf are now on the ground hanging out next to our amazing propane work heater. That heater is the best way to take a work space from freezing eyeballs temperature up to a pleasant frostbite feeling. And as an added bonus, it looks kinda like R2D2. Almost.
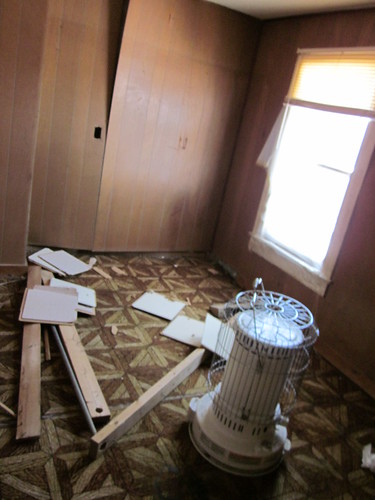
The ceiling tiles were a lightweight pressed paper product and thankfully were tongue and groove style stuck up there. Which made them really easy to pull down when I didn't have to worry about any errant bonks on the head. Crazy easy to jam my crowbar (Mr. Smashy) up and just pull pull pull, they came down with almost no effort. I started stacking each tile into neat(ish) piles. Right next to the second makeshift closet of the room. Who know you could have so many faux closets in one room?

 Once the tiles were off the ceiling, I went around the room and pried off all the trim. Which was annoying in the fact that all I wanted to do was start taking off the paneling! But the trim was a necessary step before the paneling. All the trim was well attached to the walls and would NOT budge no matter how hard I tried to pull it off with the whole panel. Bummer. Whomever put up the paneling did it right, if there is even such a way of putting of fake wood paneling right.
Finally, I got to start on getting the paneling off. Thankfully it came off with almost no fight. The glue that was used to hold it up had long since petrified and was hard as a rock. A small benefit to working in the freezing weather.
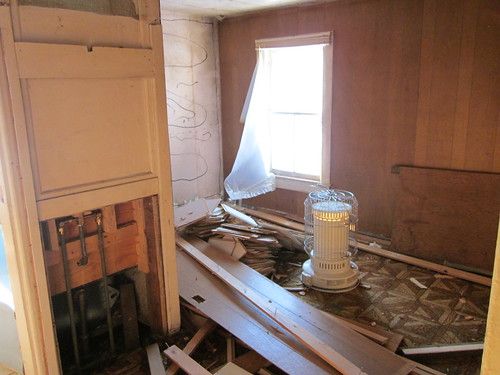
Where was Pete? Knocking down our suprisingly sturdy fake closet. It really helped to open up the room back to its original shape. This house is so disjointed and messed up that it makes me laugh. Doors where windows should be, parts of the wall missing, holes cut in the floor... sigh. Got to uncover it all to see what we're working with here.
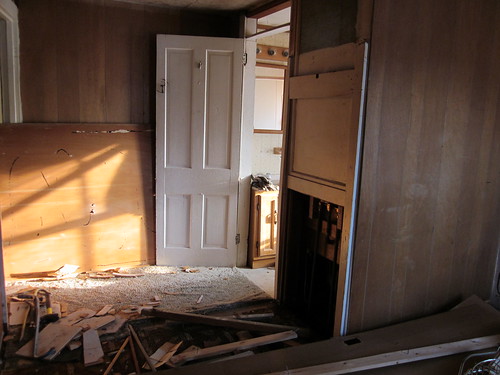
Once the tiles were off the ceiling, I went around the room and pried off all the trim. Which was annoying in the fact that all I wanted to do was start taking off the paneling! But the trim was a necessary step before the paneling. All the trim was well attached to the walls and would NOT budge no matter how hard I tried to pull it off with the whole panel. Bummer. Whomever put up the paneling did it right, if there is even such a way of putting of fake wood paneling right.Finally, I got to start on getting the paneling off. Thankfully it came off with almost no fight. The glue that was used to hold it up had long since petrified and was hard as a rock. A small benefit to working in the freezing weather.
Where was Pete? Knocking down our suprisingly sturdy fake closet. It really helped to open up the room back to its original shape. This house is so disjointed and messed up that it makes me laugh. Doors where windows should be, parts of the wall missing, holes cut in the floor... sigh. Got to uncover it all to see what we're working with here.
Oh dear- I meant to tell you to save the paneling for me. Would look nice in the kitchen don't you think? Oh well too late.
ReplyDeleteLots of love from M.O.M.
I can't wait to see the space when you are done. Demo that isn't too crazy hard and "comes down easily" is always my favorite. It makes you feel so accomplished!! I love your blog!
ReplyDelete