October 29, 2010

All up on our roof


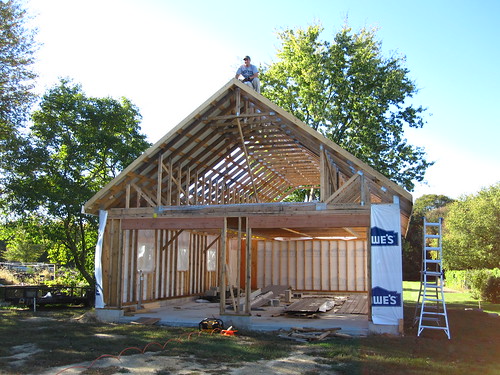
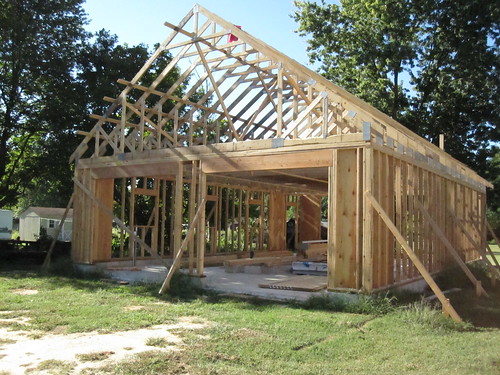
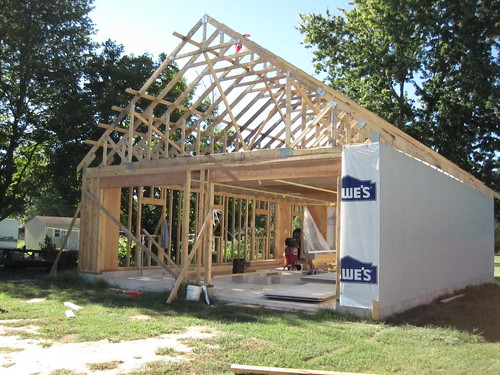
Run down of putting up the metal roof so far....


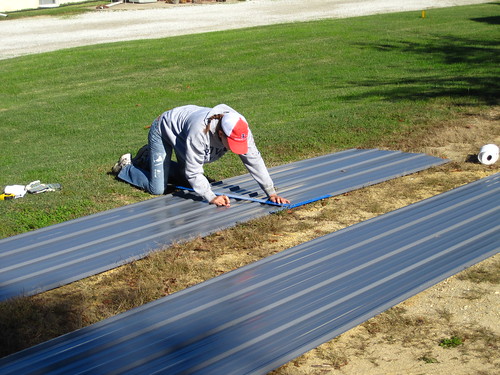
1. Pull roof panels out of pile in garage and scatter about lawn

2. I measure and mark out the locations where Pete is going to be putting the screws

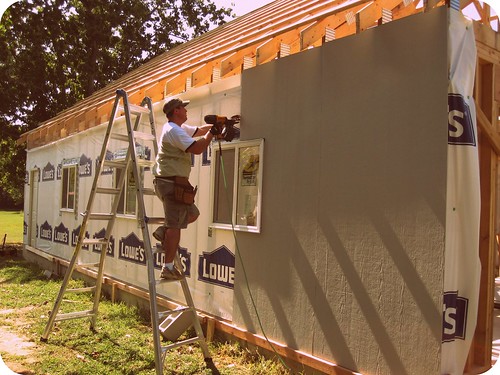
3. Grab panel and walk over to garage, Pete climbs ladder and puts top of panel on the roof.

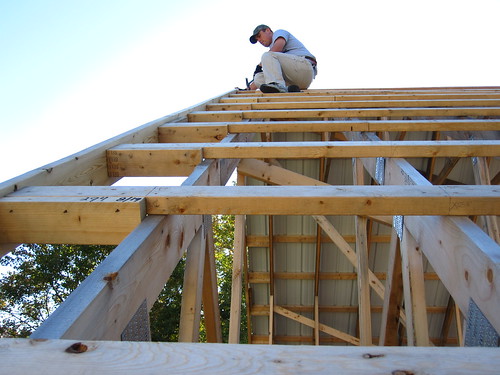
4. I tell Pete to be careful as he starts to climb onto the roof purlins

5. Using my massive muscles I push the panel up as high as I can get it on the roof while Pete climbs up to get it.

6. Pete grabs panel and holds it while I'll let go to climb the ladder.

7. Once on ladder I push the panel up one handed until we get it up to the peak.

8. Line panel up.

9. From the top of the ladder I hold the panel lined up and keep it from sliding down off the roof.

10. Have extreme concerns about the panel slipping and beheading me as it slides down

11. Pete places first screw it at the top. I can let go and hop off the ladder now.

12. Pete continues going down the panel screwing it down into place

13. I mark out next panel on the lawn, as heights make my palms sweat in an extremely unattractive fashion. I barely am ok with the ladder.


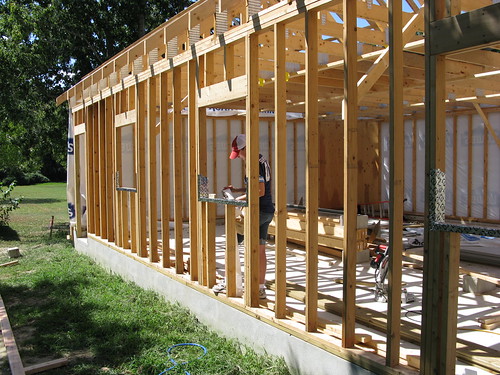
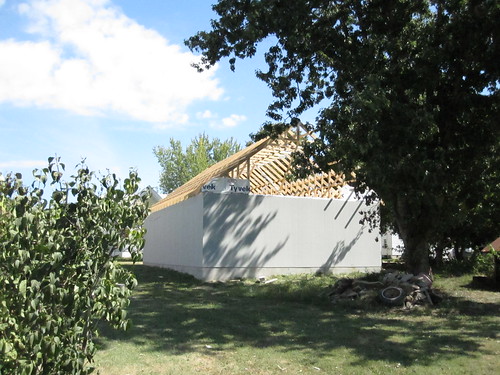
You can see why there are no pictures of us putting the panels up, cause we need our hands! The panels aren't super heavy, but you can definitely start to notice some fatigue setting in by the fifth oneof the day. It is a lot of upper body strength used in bursts when putting them up. I love how they cover such a large area, so you see results as soon as you get a panel up. Very gratifying to have something that shows results almost instantly, even if it is overall slow work.


West Bumble New Jersey

I like living in the middle of nowhereville New Jersey...Not a house in sight and not one other car drove by the whole time Pete snapped these field sunsets shots on the back roads as we drove home from a hard day of work on the Wee house.


October 28, 2010

Garage Roof Situation

The last few weekends we've just been slogging through getting the garage roof done. It is definitely one of those slow but steady processes as we just can't seem to find a way to work any faster. As it is now, it takes us about 40 mins per metal panel of roof from the ground to finished installation. There are 30 panels total.

Why a metal roof? Mainly cause we thought it was cool. Isn't that always a reason to make a major decision that will be around for 40 years- for the Cool Factor. Metal roofs are pretty uncommon in the state of NJ, with the exception of broke down rusted sheds in back yards and random commercial properties. We've found that metal roofs are all rage outside of NJ. In fact, during our road trips we always end up pointing out all the cool metal roofs we see along the way.

Random factoid- Sookie Stackhouse ( of True Blood, my current obsession) has a metal roof. It is mentioned in books a few times and shown on the show.

One of the biggest benefits of choosing to do the metal roof was the fact that we didn't have to lay plywood/osb all over the roof the way you have to with asphalt shingles. You just have to put a series of 2x4's (purlins) up and the roof gets screwed into those. 2x4's -while not cheap when you have buy things in large quantities-are buckets of money cheaper than osb, which runs about $13 a board here for the cheapest stuff.

Then came the fact that I've helped dispose of two asphalt roofs in my time and they were hell to get rid of. I clearly remember shoveling the shingles off the trailer and into the dump and thought/wishing I would pass out because it was just that hard. The shingles are heavy, they break apart, are rotted, it smells like shit, and all sorts of gross bugs have made their home in the mess. Anything to avoid doing that again.

Along with looking cool, I love the fact that the metal roof can be recycled when its time is up. No trip to the dump for this roof! There are a lot of other major benefits to having mental roof and they are all available via a quick "metal roof benefits" search on Google. So far I'd recommend anyone in need of a new roof for a shed, garage or house to check it out. I'm iffy on recommending the DIY installation for a large structure, cause it is a wicked pain in the rear and we fubared a little part of it already.

I just realized that I've been lacking on the pictures during October. Perhaps I need to institute my "No post without a picture this month" policy again for November...

October 25, 2010

Garage Door Quest P.2


After a lovely drive on the back roads through the state of Maryland, of during which I only had one hunger induced meltdown about the way Pete printed out the Google Map, we arrived in the City of Frederick. Found our way to seller house and pretty much instantly upon arrival we were amped up.


The house was awesome, a large old historic home set on an idyllic lot in the middle of dream hamlet of stately old homes. The kind of neighborhood you walk around and just drool at when you're a historic home junky. Out of respect for the seller B* I'm going to gloss over a lot of the location details and story that led to him getting new garage doors. But I will talk about this house and B* cause he and his house were really just that cool.


Being super awesome and because Pete and I do not look like (nor are we) crazy weirdos, B* took us on a tour of his home and gave us the run down of the history behind it. We were enthralled as he showed us the original leaded windows, down into the basement and up to the third floor. It was really great to talk to another old home enthusiast and to see how he and his family have made living in such a historic home work for their modern needs without taking away from the original charm of the place.


After about an hour of talking and loading the garage doors on the trailer Pete and I really wanted to take a walk around the city. B* gives us directions on how to get to the downtown, offers us the use of his bikes and then tells us to pull the trailer into his driveway so we don't have to worry about someone messing with the doors. Nicest guy ever. And I don't even offer the people I meet for CL drop offs a glass of water.


We took a walk around the city, soaking in some more of the awesome historical homes and beautiful architecture. We grabbed a quick bite and ice cream for the nice walk back to the car. It was all in all, a great way to end our CL adventure.


Plus, we really do love the garage doors! Win all around!


October 21, 2010

Garage Door Quest P.1

Budget left for garage: pennies
How much garage doors cost: lots of pennies.

You can see our conundrum here. Garage doors are like woah expensive, which might explain why they are really something people don't replace often. Or ever get rid of gorgeous, drool worthy carriage garage doors for super cheap.

We shopped the big box stores, finding that the in stock options didn't really jive with the look of the barn garage. Briefly we thought about creating rolling barn doors for the front of the garage, close to what we have here on the current garage. Except that we don't really like the functionality of the sliding door for a garage. It can be a bit of pain when it comes to getting light in the garage or getting a car in and out because you can only open one side at a time.

Then for like a half a second we entertained the thought of getting gorgeous carriage doors made. But when a comma and a few zeros were attached on that price tag we slowly backed away from that idea.

Frustrated we turned to craigslist and searched all the areas around us to see what was available. When it comes to a big purchase like this we usually search everywhere within a 5-ish hour driving radius. No point in letting driving limit the potential to find something that could be perfect for us.

And in western Maryland- we found them. Potentially awesome garage doors for a great price! Pete started up a line of communication with the seller to find out more information and from there we started to get really excited about these doors...


Up next- the all day road trip and how freaking awesome the seller ended up being...

Anyone else willing to make the drive to find that *perfect* item for a great price? Or are we the only nuts who think nothing of hopping into the car and driving far far away to save some money?

October 20, 2010

updates

State of the Fourth Door:

- We have just returned from a seven state 1,600 mile road trip in a Mini Cooper.
- I LOVE Savannah!!
- The barn garage has about 65% of its roof.
- I crossed off alligator from my "seen in real life" wild animal check list.
- It is effing cold in the house again. No using heat until November is in full effect.
- My commute takes too damn long
- People in the south make the worlds greatest fried chicken.

Things that are not good:

-I'm about 85% sure that I've broken my nose. It makes funny squeeks and noises when I sneeze. When the weather patterns shift I can tell because it feels funny, like its swollen.

The end.

October 11, 2010

Thanks for the paint help!

Thank you so much to everyone who chimed in about the exterior paint confusion. It is good to hear about all the options that have worked so well for different people in the past. Especially hearing good things about Sherwin Williams, right now we're thinking they are going to end up being our go-to option when it comes time to buy the paint.

The solvent free linseed oil paint seemed so cool! There are so many aspects to the paint that I really love, however I just can't seem to find myself willing make the barn the guinea pig for it. Especially given the high price of $124 per .85 of a gallon for a product we've never used. Despite my normal willingness to try new products like the paint I am a little gun shy on this one. Who knows why. Maybe I'll give it a whirl on a smaller project in the future.

Next up on the decision front- Picking a color for the barn.

Thank you!!! :)

October 7, 2010

Paint Brand Help Needed!

Please talk paint with me.


I need help narrowing down all the options for exterior paints. There are just so many to choose from that it is hard to stop from feeling a bit overwhelmed. Our go to interior paint is usually Kilz because we loved the coverage on our plaster walls and the great containers ( which they don't use anymore). The fact that it is very affordable for a gallon is also a nice little bonus.


With the garage/barn we want whatever paint that will provide the best durability for a long time. Something that will stand up to the elements without looking like a POS in a few years. Our only experience with exterior paint is with Finneran and Haley a few years ago and we weren't overly thrilled. Besides they aren't even in business anymore.


We're leaning towards Sherwin Williams, but would LOVE some input and real life experiences with exterior paint. Is paying top dollar necessary? Or is there a cheaper gem option?


Many many many thanks!

October 6, 2010

Flashing

This might be the first time that I've ever flashed a window where a picture of me doing so has ended up on the Internet. Though its a picture of the boring version of flashing, nothing to do with booze, beads or Mardi Gras. Everything to do with installing a window. Yawn.


I've never really installed a window before. When Pete was replacing the windows in our current house I helped him in the form of holding the window still and bitching about the glass splinter I got. Being as this was new construction where everything was built square by us and to the exact measurements of the windows we purchased- I was up for the task. Trying to fit a replacement window into a existing space is much harder.


Installing the windows was one of the easier DIY things I've ever done. I'd put it a few notches below "taking a nap on the wood pile while Pete works". It took a little know how, which I got from Pete taking the lead and reading the instructions that came with the windows . And it involved caulk, nails and not dropping the window.

Like a lot of the construction I do around here, I don't feel comfortable giving you an extensive "How-To" guide or real in depth pictorial. But I can comfortably say- Give it a shot.

After the sills were flashed by moi, the entire wall got wrapped by the house wrap. Right on top of the window and door openings. Once the wrap is on completely you staple it down like crazy and then cut an "I" shaped slip to use as the opening for installing the windows.

The Pete magically transported back to the 1960's while nailing down the siding. Or I got bored and played around with the Picnik options while posting this...


Through the magic of the time warp internet- here is the finished sided wall! Three walls done, One and a half to do before winter!


*Looking for some helpful hints to window installation? DIY Network has some great info on their site here.


September 30, 2010

i heart air nailers

When you list your air nailer as one of your BFF's, you know you need to step away from the construction for a little while. I can't help it though, the tool is saving us from the massive arm and hand failure that we would have if every single nail had to be pounded in with a hammer. Not to mention keeping our siding looking a whole lot better. Could you imagine if Captain misses a lot (me) tried to hand hammer all the nails? There would be holes all over the damn garage.


At the start of this project I repeatedly professed my love for the air framing nailer. And I still love it. A whole lot, especially since Pete was able to fix it right back to working after its unfortunate *poooffff* incident. Well now our siding air nailer is getting the same love from me.

This is the one we've purchased. I know that buying an expensive tool for single one-off jobs isn't really in the cards for everyone. And that renting might be a better option for your own needs based on a wide variety of reasons. I just know that for us, and based on the projects that we currently have on our plate, renting a tool like this every time we needed one would be a colossal waste of money. It is much more cost efficient to buy the tool and have it available to us when we need it.

Pete takes really good care of his tools, so this one time investment should last us a long time and can hopefully be put to good use for many people. You never know who will need our help putting up siding! Or if we decided to re-side the entire house ( very likely).

Anyone else out there with power tool bffs also? Or is it just me?

September 29, 2010

To life

Normally I try to keep this blog pretty single focused about house related topics. But sometimes things come in your life that you feel the need to share because they are so significant that you are really forever changed as a person. These last few weeks have been that time, and things have been quite rough around our house lately.


At the beginning of September Pete's Grandpop went into the hospital and when he left nine days later it was with a very serious cancer diagnosis. With knowing the delicate nature of his heath, the family rallied around him trying to make his last days as pleasant and full of love as possible. In a matter of a week Grandpop declined to the point where Pete and I knew it was time to say good bye.


The funeral was yesterday and was a beautiful tribute to the full life of a great man.


September 23, 2010

Tootles Tv

Every fall Pete and I debate the same thing: Should we or should we not cancel the cable down at the beach condo?

For a few years we fell pretty solidly into the Should Not column because of a multitude of reasons. Usually it was because we didn't remember to call until a few months had passed and by that time the disconnect and reconnect fees were going to eat up a lot of our potentials saving. Secondly, we do try to spend time down there in the winter and having tv to watch while you do work around the condo or veg out is really nice. In fact it was lovely to have last winter when we re-did the bathroom. In the past the cable company offered special winter rates that allowed us to get our normal package for a lot cheaper. Which when added with the fees, made it not that bad money wise to just keep the cable.

Last year the cable company dropped a month of the winter rates and then restructered the channels that you got for the low price. Suddenly we were paying a decent amount of money per month for every home shopping channel, one highly political news channel and the local sports station. Nothing else. When we called, the company claimed that in order to get our old channels back we'd have to upgrade our off season package.

Pshaw.

For the rental season we provided a complete (yet basic) cable package and wireless internet. Pretty much the day after our last renters packed up we were at the cable company handing them their box back saying "No more please". We asked about keeping the internet, which would allow us to stream tv and movies, but was told it was going to be $65 a month for that alone. Ha!

Bye internet and tv at the beach house.
Hello $800 a year savings.

September 22, 2010

Back wall siding up!


Closing off all the walls one by one...It is strange to not be able to see through the walls and into the backyard anymore! So funny how fast you get used to half done construction.

Since we knew what to expect from having already doing the long wall, there weren't many surprises during putting up the siding on the back wall. Only two small obstacles presented themselves during this wall.

The first was that the back wall of the garage is higher off the ground than the side wall due to the grade of the yard. That meant lifting the heavy panels even higher trying to get them on the support ledge. Thank you Aleeve for calming my screaming back.

The other issue we had to work through was cutting and extending the house wrap higher than the long side. Since the paneling will extend up the back of the garage we needed to make sure all the wood was covered by the house wrap with at least six inch of seams overlapping. Pete had a spare little roll of house wrap hanging out in the other garage that worked perfectly since we didn't feel like cutting up the big mondo roll.


Ta-da!


* Its funny, but I think with this wall up I've discovered a new favorite spot in the yard- right behind the garage! This spot is where we eat lunch while on the job and we chill out in the shade during water breaks. Oh, that pile of rubble next to the tree is left over from our concrete crew earlier in the summer when they tore up the old slab. We saved a decent amount of money if we cleaned up the site ourselves, instead of having the work crew doing it.


September 20, 2010

Our Out Building Money Pit


Not long ago Pete presented me with a little yellow sticky note in the car when he picked me up from work ( we commute together). On it was the total we've spent on the garage so far.


I gagged a bit.


When you're building something big (like a garage) you know it is going to cost money (ok, a lot of money). We had no delusions that this was going to be a cheap project. The wallet was going to have to be opened, even with all the DIY jobs that we were planning on. Mentally preping yourself to spend thousands of dollars only helps so much though. Actually spending the cash and watching your savings account dwindle down lower and lower can be a harsh reality check.


I likend it to planning our wedding. We knew (thanks to our budget) what it was going to cost us overall. Every day those numbers ran through our head while planning. However when it came time to actually write those checks out as the wedding date drew closer and closer...yowch. And then the reality of the bank account the day after the wedding...


Hopefully when it is all said and done I know we'll love the garage and it will have been a really worthwhile investment in our home. When we sit back during water breaks and just look over the construction zone it is so fun to talk about how we'll use it in the future and what will go where. You have to maintain a positive attitude about a big slow job like this, focusing on the end result. Dwelling on the hard middle part can be a big killjoy.

Even though the sticky note number provided a reality check and a reminder that we need to keep tight reigns on the rest of the budget for this project. It was still nice to see how much we've gotten done for that amount. Maybe its because my best friend Google has provided us with some rough estimates for building a four car garage in NJ and so far we're coming in about 50-80% LOWER than those various quotes. One site even had the range for a four car garage at 108,000. Um. I'd stroke out if we spent that. For real.


I'm not trying to be coy about the price spent, I just don't feel comfortable yet giving out the budget until we have something that really shows off our investment. Eventually when it is all done, I post a budget breakdown.


September 17, 2010

First outer wall up!

After the garage was mostly framed out, we started on the siding. The first step was to completely wrap the garage with a layer of house wrap. One big mo-fo roll of the house wrap was about $200. You saved $50 if you used the store brand instead of the brand name without a big ol’ logo on the wrap. So we sold out and decided to become corporate whores with the garage wrap ad to save the dollars. You win if you can figure out which big box store we bought the house wrap from, it is very subtle...


Wrapping the whole garage was pretty easy and fun. I unrolled the wrap and pulled it tight while Pete hammered in the nails. You have to pay attention to make sure the wrap stays level and covers all the exposed wood. Other than that, it was nice and easy because while the giant nine foot roll is a little awkward to handle, it isn’t heavy. We wrapped the long western side wall, and tucked the roll back into the garage for the time being. The heavy duty stapler helped get the wrap on the garage nice and tight.


Then, almost excited at the thought putting up our first piece of siding, we grabbed the nine foot section of cement fiber siding and tried to get it up on the wall.


Fail.

There was no way one of us could hold the board in place while the other shot nails in it. The boards are heavy, I’d put them at this-is-really-heavy-and-awkward-to-carry weight range and are extremely hard to handle (impossible) by yourself. We just couldn’t hold the board up flat against the wall and get it secured at the same time.


Quickly using those lumps that are three feet above our asses (bonus points if you know the movie ) we turned our plethora of scrap wood into a handy shelf to put the siding on top of. It was a little difficult to level the whole thing and then find a way to secure the shelf because, there was nada to nail it into on the side. The siding needed to cover all the wood which left us with only the cement blocks exposed. As a solution for that We whipped up corner braces and stakes to hammer into the ground for support. About an hour and a half after our original attempt, we try once again to get the siding up.


Success!

The ledge worked fantastically and we were able to get the first panel up and secured with little trouble. That is, if you don’t count the major muscle strain that it took to lift that unwieldy and heavy panel a foot or two into the air. You should see how much Aleve I am taking lately. I had to (temporarily) stop drinking beer because I’m afraid of causing liver damage. Or is that just with Tylenol and I can crack open a cold one after work again?


Second panel did not go up as smoothly as the first. We got the panel up and realize it is crooked. Damn it. Then, I absentmindedly softly kicked it into place- Bad idea! I cracked the bottom and it crumbled off. Whoops. To fix the lopsided bit we grabbed some shims and straightened out the panel using them. Since the west wall of the garage doesn’t have any windows, it is one super long stretch of putting up the full sheets of paneling. This needed to get up not looking like we did it while on a bender.


We worked and worked and worked...

Dealing with some challenges along the way required head scratching until we figured out a solution. Such as one really twisted framing board that fell right where the seam between two panels was supposed to be. A few quick cuts of an extra 2x4 and we had that board sistered right up. There was shimming going on left and right. Sweating, since this was on the sunny side of the building in the afternoon and lots of “I’m gonna drop it!” shouts but after a few hours of super hard work- we had our wall up!


:)